Christmas In July Cardigan
Welcome to the Christmas in July Cardigan Crochet Along
Get your favorite holiday yarn ready because we're about to create something truly magical!
Over the next four weeks, we'll crochet a beautiful patchwork Christmas cardigan featuring 54 festive granny squares. From cheerful Christmas trees and Rudolph to wreaths, snowflakes, Santa, gift boxes, and colorful holiday lights, every square adds another piece to a cardigan you'll be excited to wear year after year.
The best part? You don't have to do it alone.
This Crochet Along is designed to be fun, encouraging, and completely manageable. Instead of feeling overwhelmed by a large project, we'll work together one week at a time. Whether you're joining on the very first day or discovering this Crochet Along later, you're always welcome. Simply bookmark this page and return each week for new instructions, helpful tips, tutorial videos, project updates, and community inspiration.
Our Four Week Journey
Week 1
Building the Foundation
We'll begin by checking our gauge and crocheting the first 14 festive squares, including Christmas Trees and Rudolph. By the end of the week, you'll already see your holiday collection beginning to come together.
Week 2
Adding Holiday Cheer
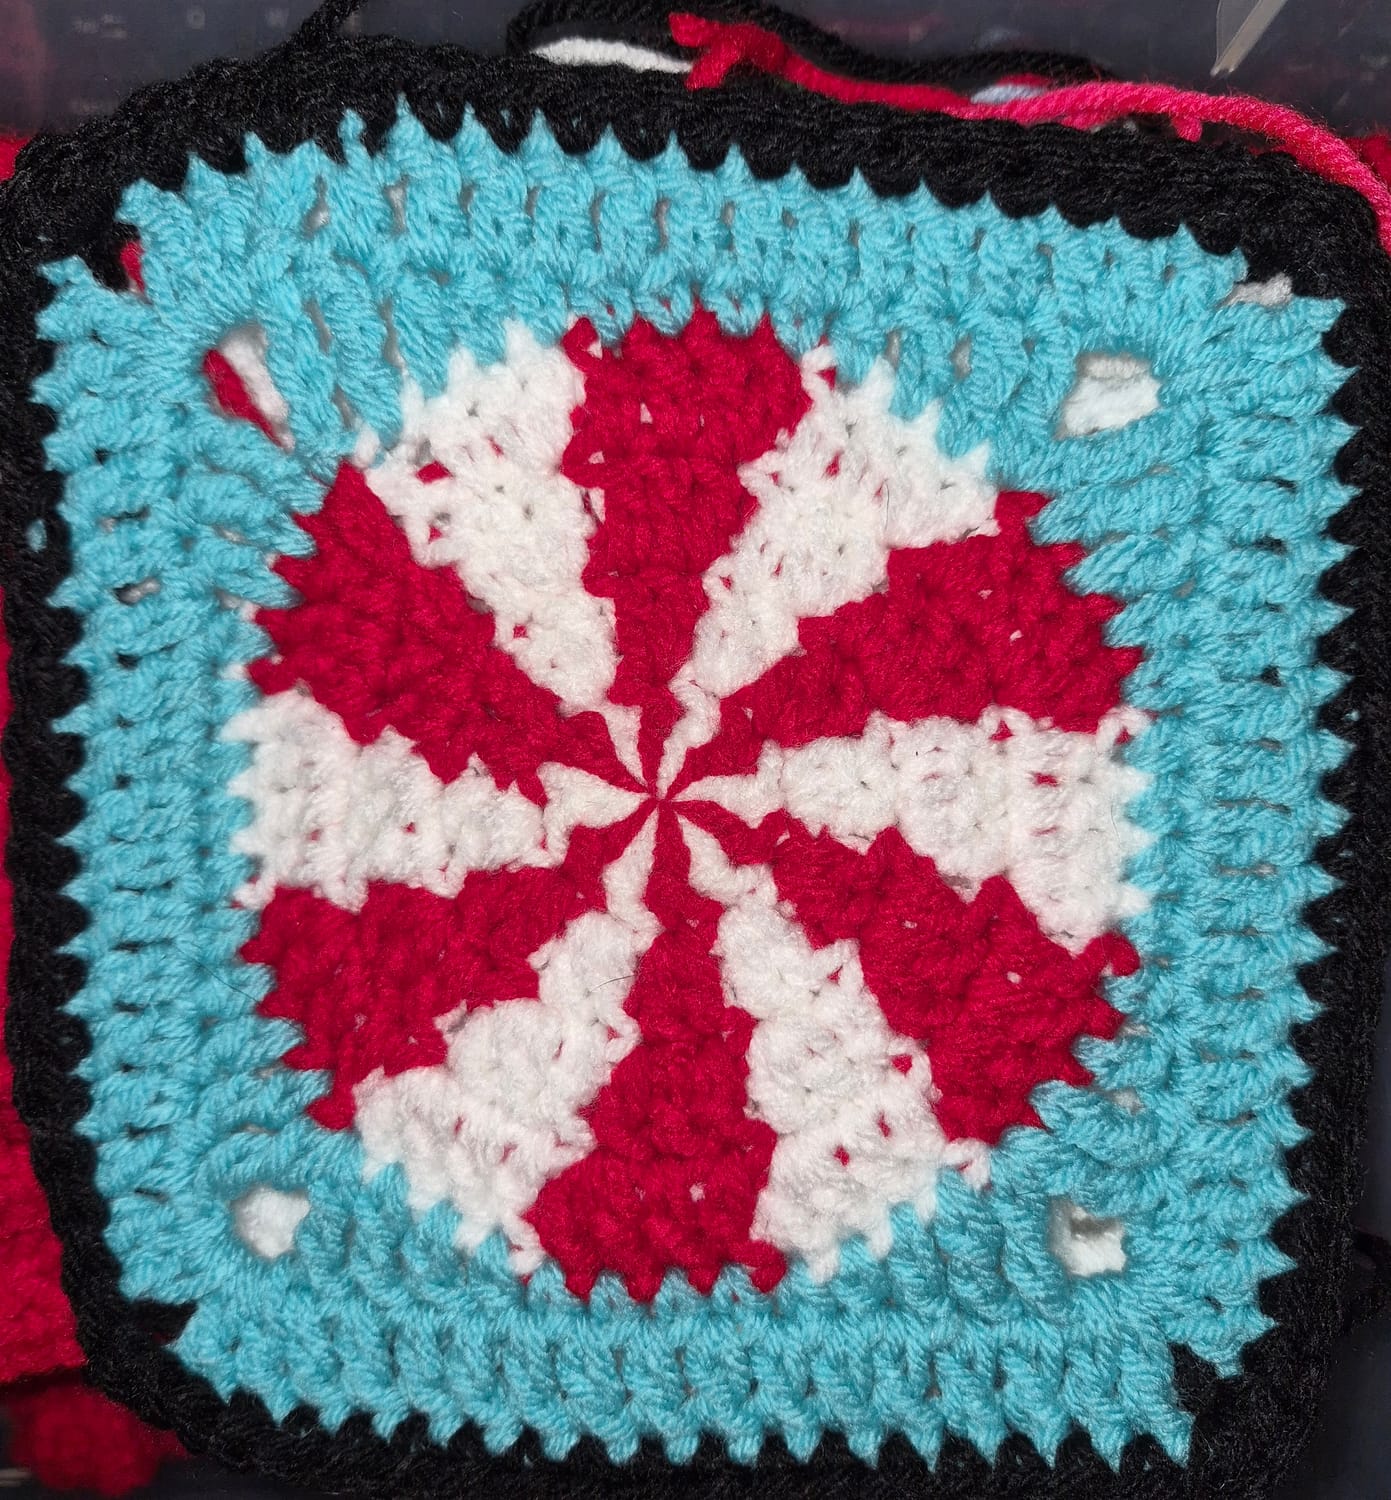
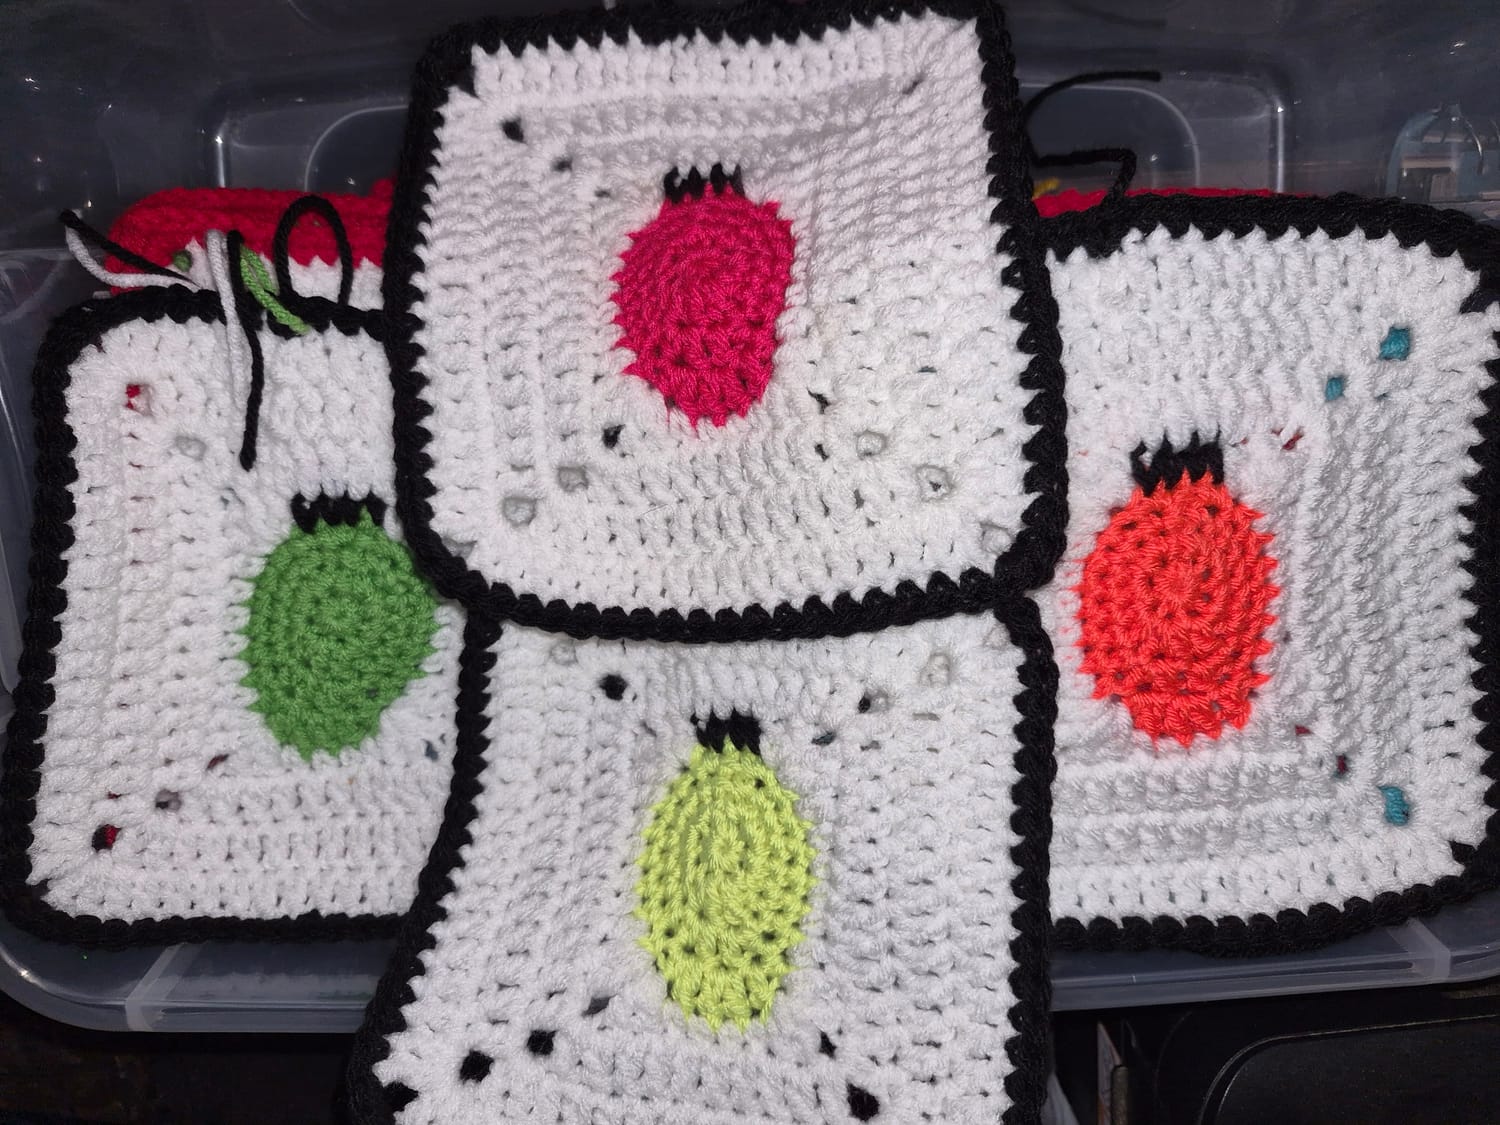
This week we'll crochet another 18 squares featuring colorful Christmas lights, wreaths, Santa, and playful peppermint swirls. With 36 squares completed, your cardigan will really begin taking shape.
Week 3
Finishing the Collection
We'll complete the final 18 squares with beautiful snowflakes, wrapped gift boxes, and coordinating filler squares, bringing our grand total to all 54 squares needed for the cardigan.
Week 4
Bringing It All Together
No new squares this week! Instead, we'll join each panel together, crochet the sleeves, add cozy ribbing to the cuffs and hem, finish the front edging, and admire our finished Christmas masterpiece.
Why 50 Squares?
The cardigan is thoughtfully designed using 50 granny squares that create a comfortable, relaxed fit.
Together we'll assemble:
One back panel
Two front panels
Two sleeves
Step by step, we'll transform a colorful stack of squares into a cardigan you'll look forward to wearing every holiday season.
Before We Begin
Skill Level: Experienced Beginner
Pattern Links: Will be released each week
Gather your supplies before we start:
Yarn: Festive shades of red, green, white or cream, brown, and a few bright accent colors for holiday lights and special details.
Hook: A hook that matches your chosen yarn, typically between 4.5 mm and 5.5 mm.
Notions: Stitch markers, scissors, and a tapestry needle for weaving in ends.
Helpful Tutorials
Progress Tracker
Keep track of your Crochet Along journey! Check off each milestone as you complete it, celebrate your progress, and watch your Christmas in July Cardigan come together one stitch at a time.
Melissa's Tip
Choose one neutral background color, such as cream or white, for the outer round of every granny square. Using the same border color throughout the project ties all of the unique holiday designs together and gives the finished cardigan a beautifully cohesive look.
I'm so excited to crochet this cardigan with you. Grab your favorite drink, find your coziest spot, and let's celebrate Christmas in July—one festive stitch at a time!
Weekly Updates
Week 1
July 1, 2026
Building the Foundation
Welcome to the very first week of our Christmas in July Cardigan Crochet Along!
This week, we're beginning with a goal of 14 granny squares, putting you one-third of the way toward your finished cardigan. Remember, this isn't a race. Crochet at your own pace, enjoy the process, and celebrate every stitch along the way.
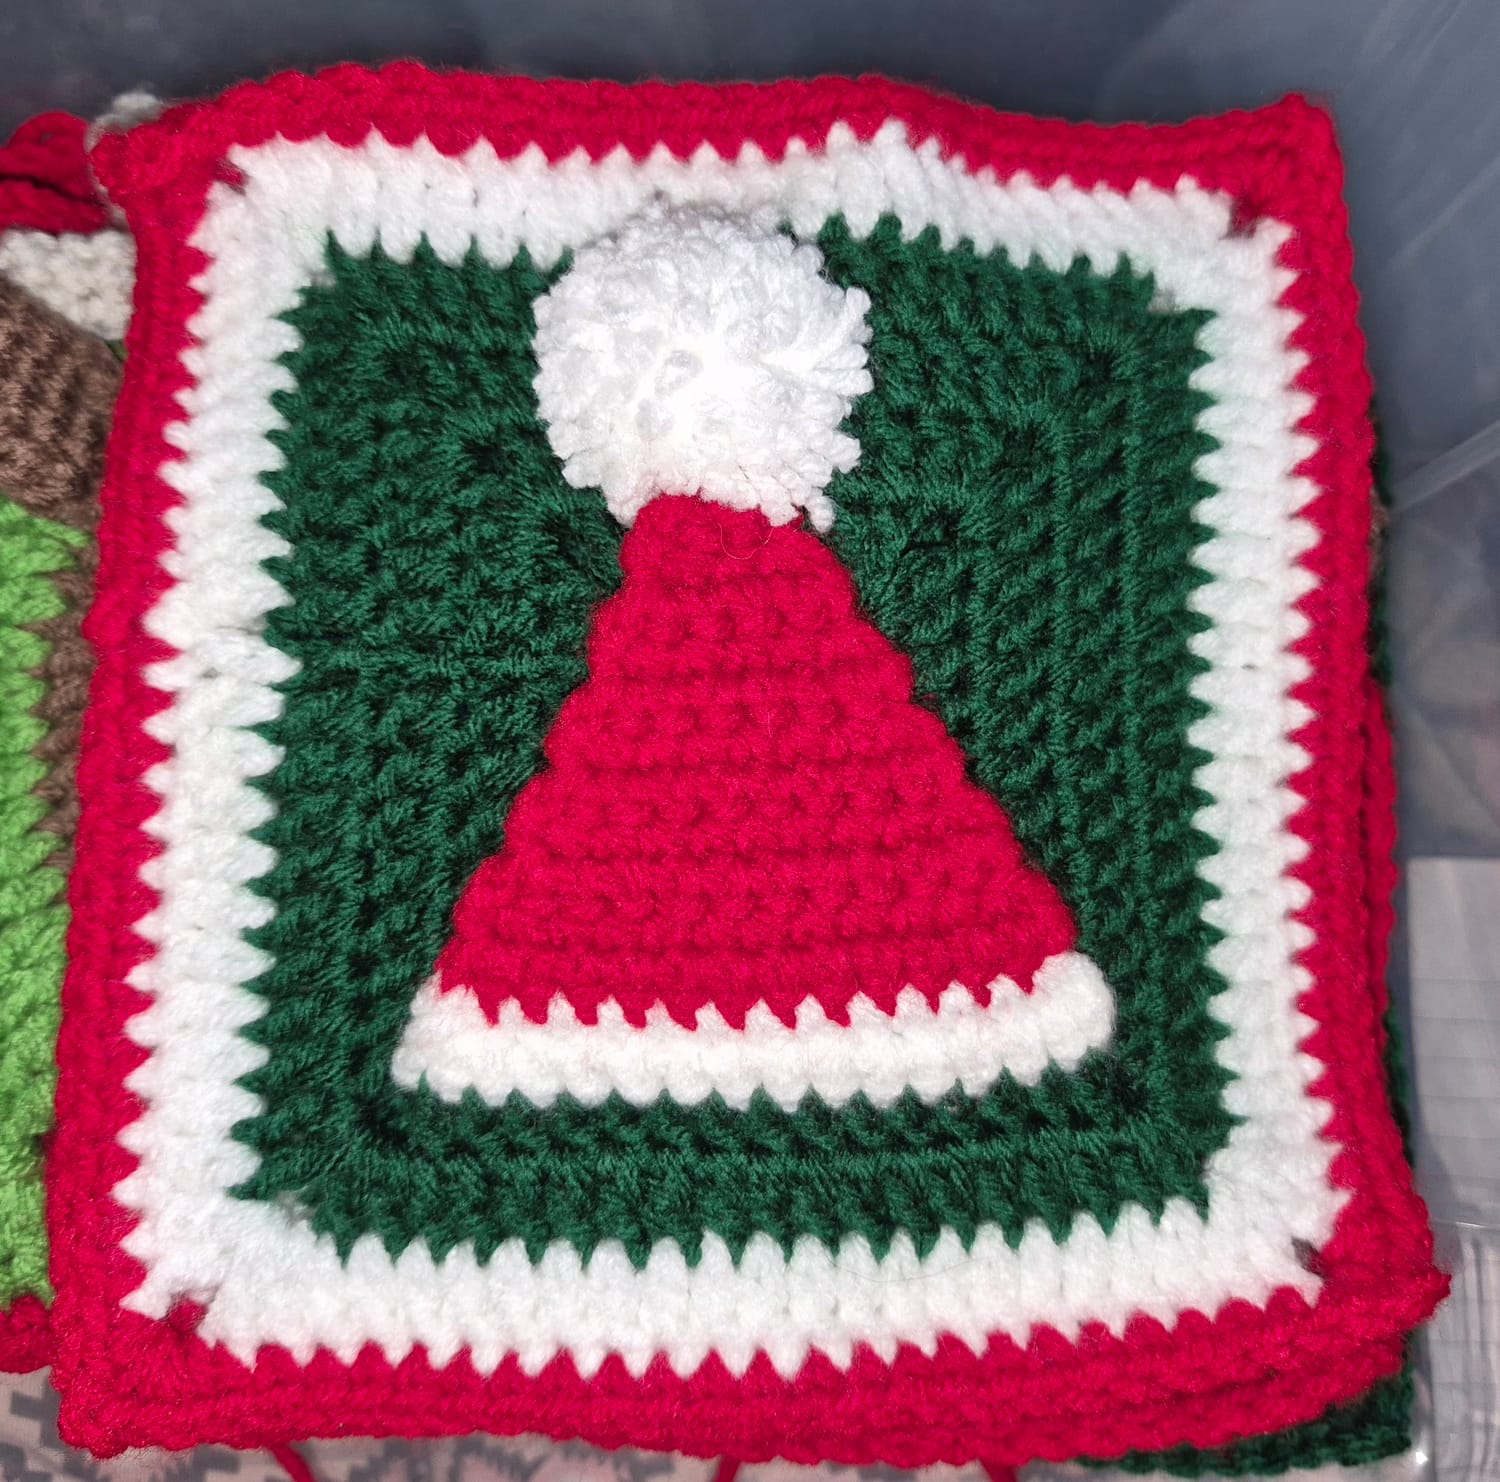
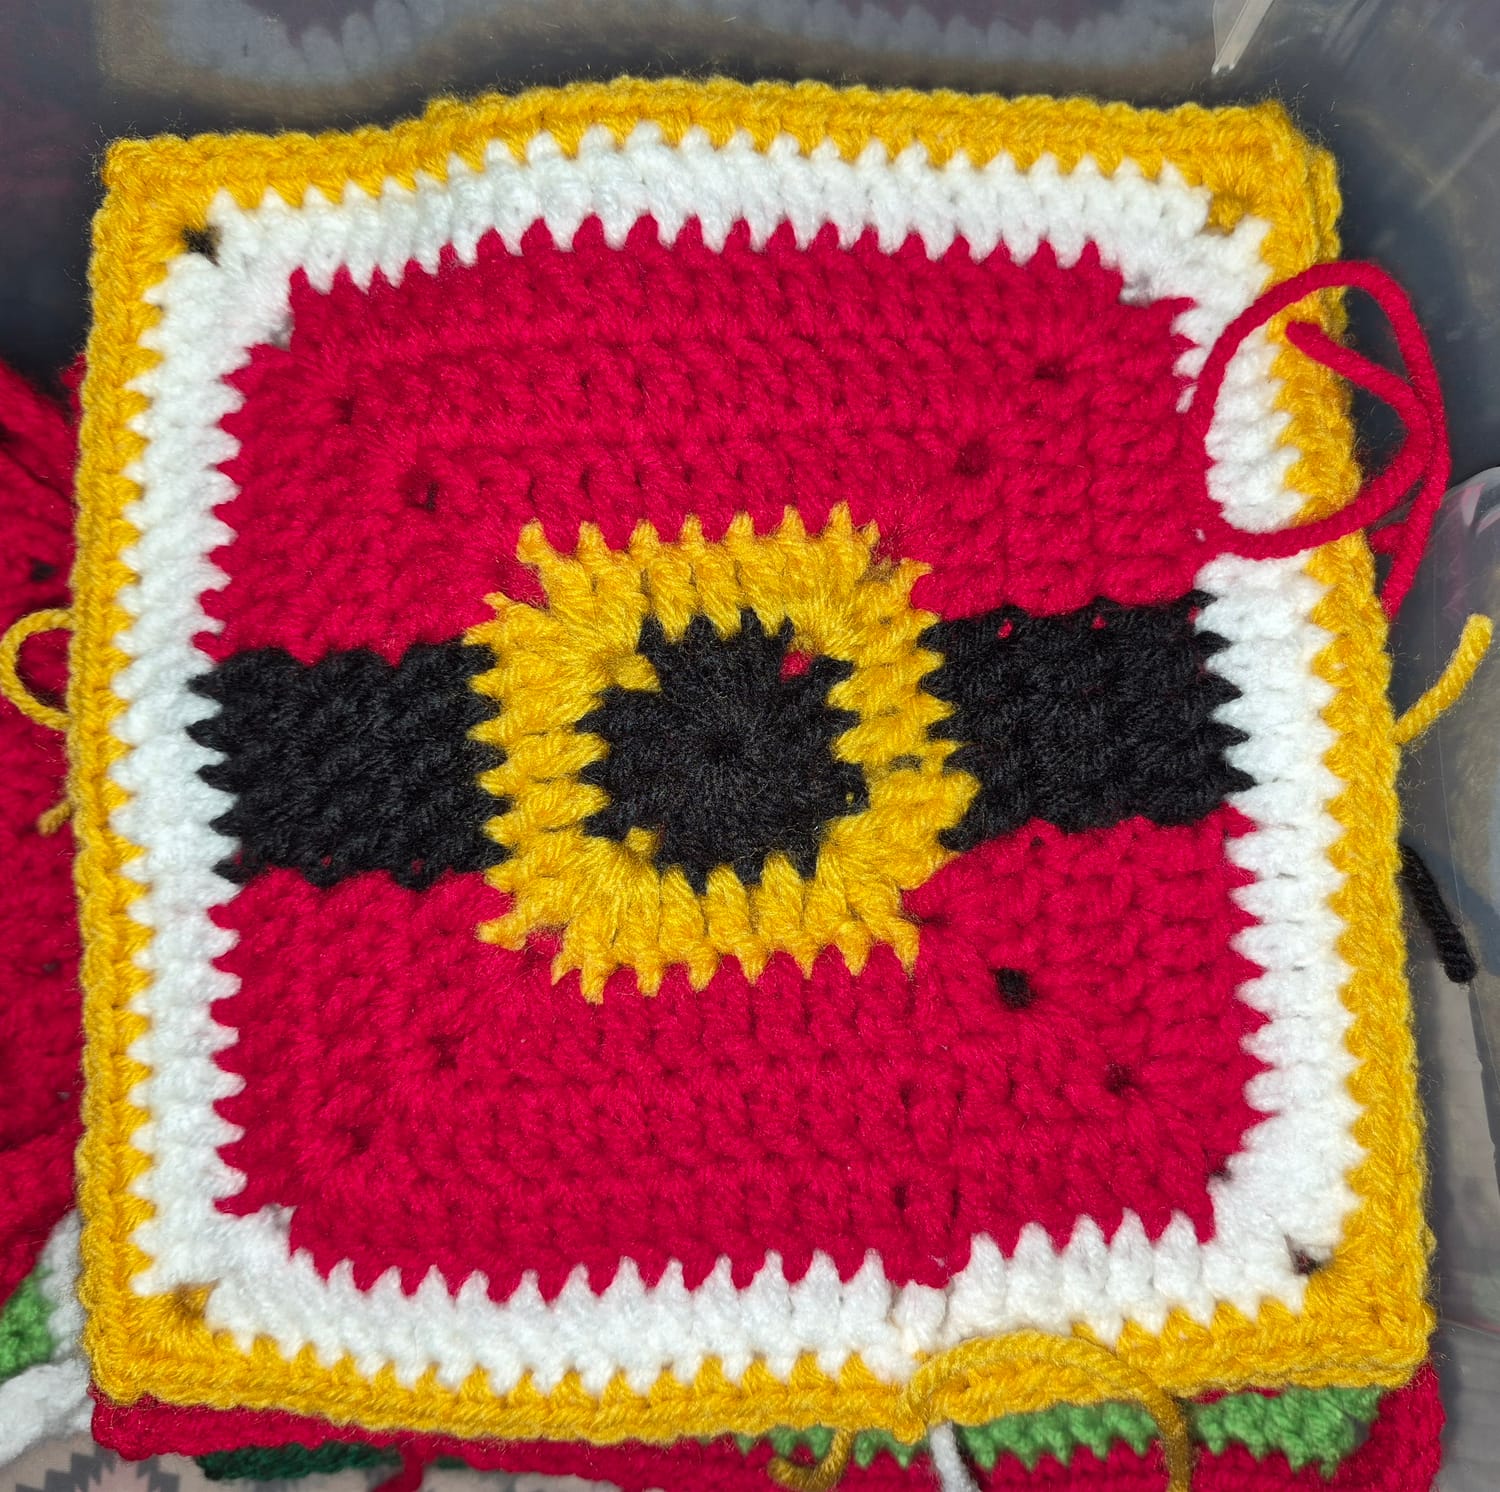
Our focus this week is creating the foundation of our holiday design with some of our favorite festive squares, including Rudolph, Christmas Trees, Santa-inspired details, and coordinating solid filler squares.
Check List
☐ Gather your supplies
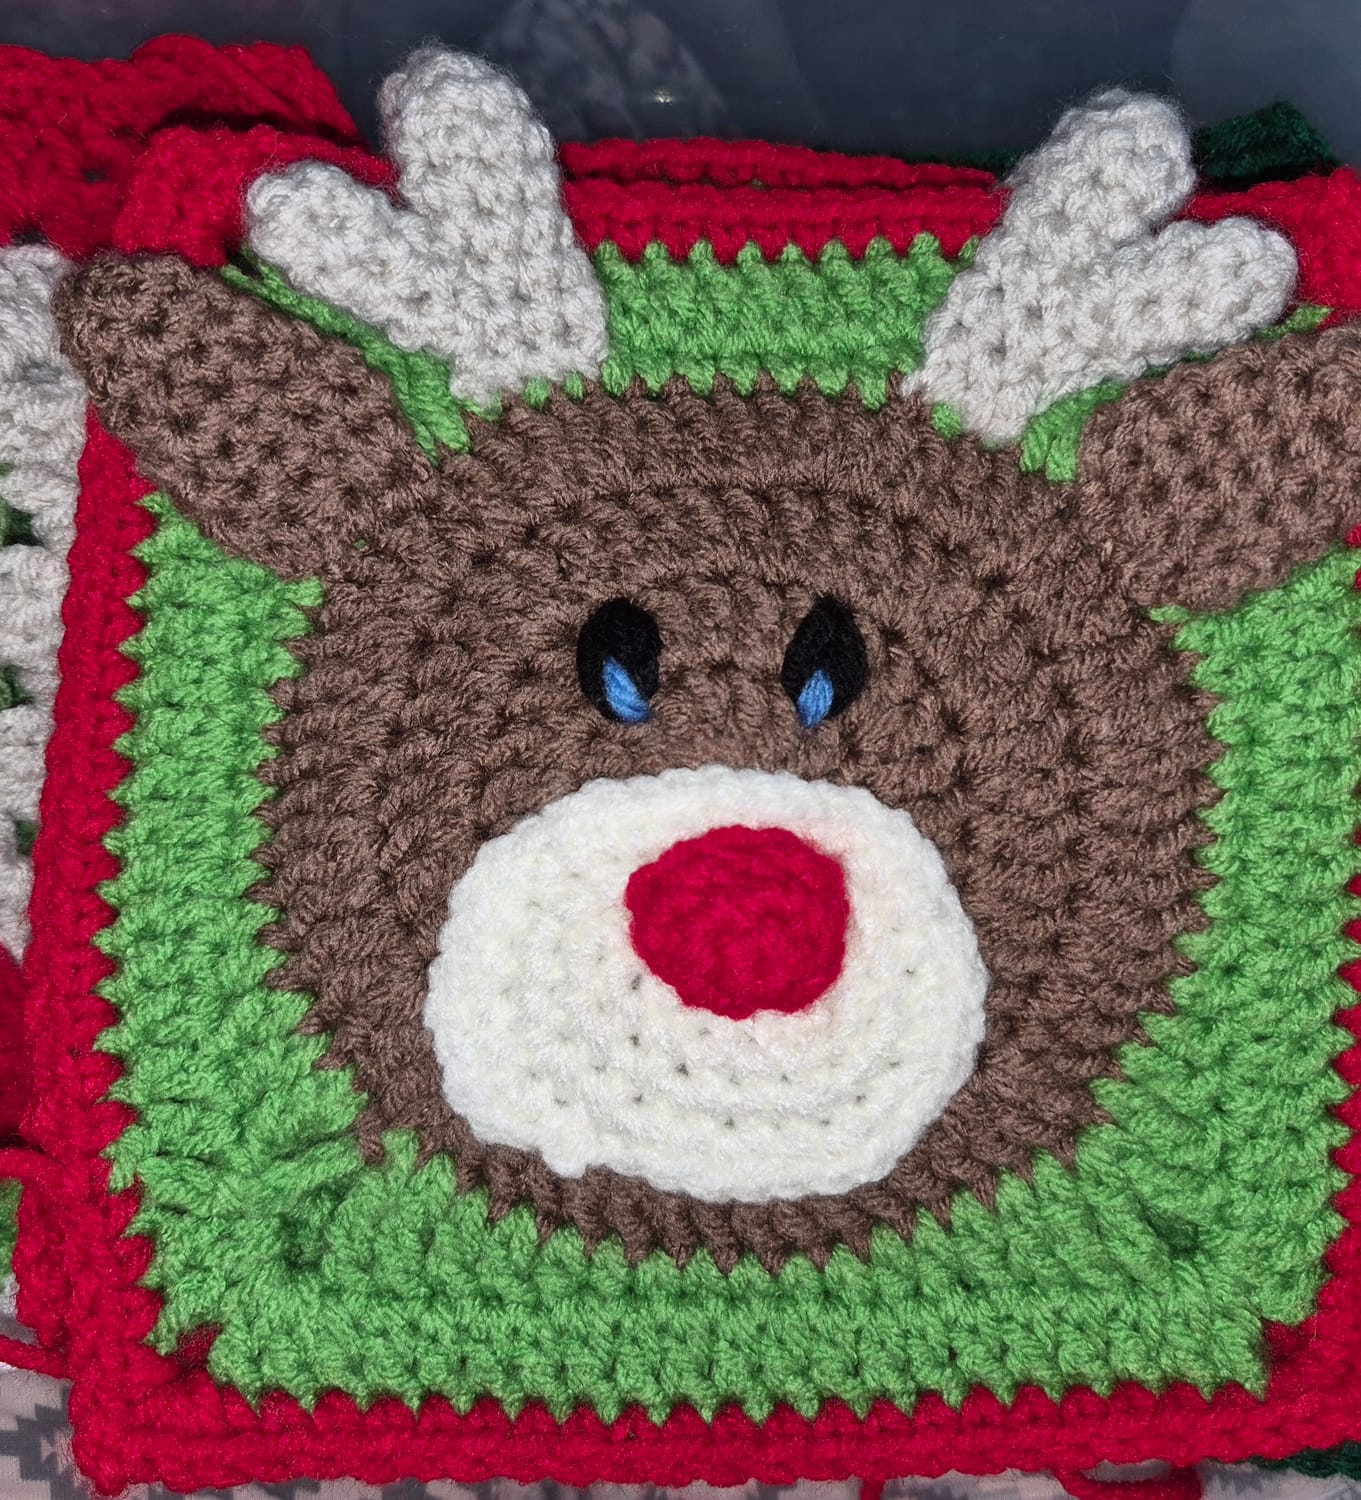
☐ Crochet 2 Rudolph square
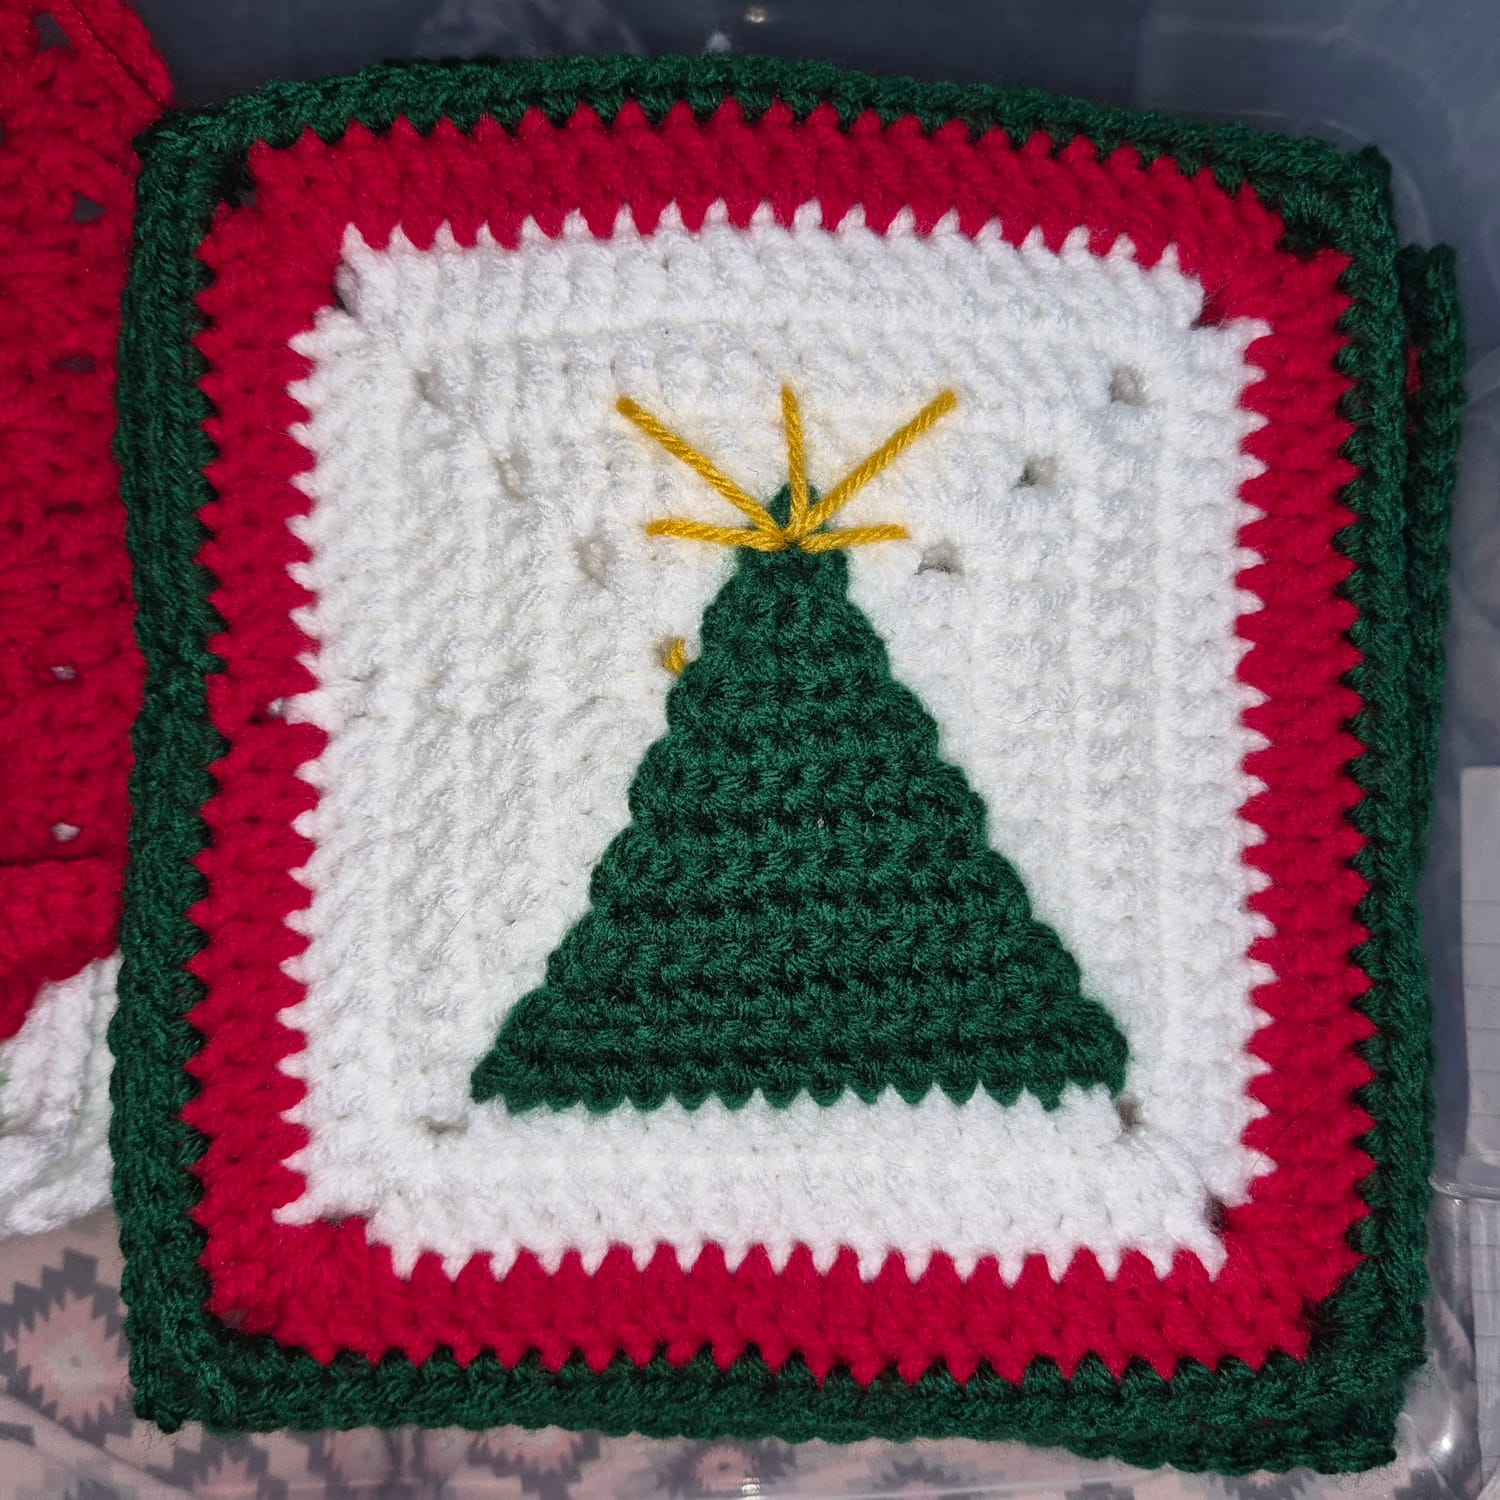
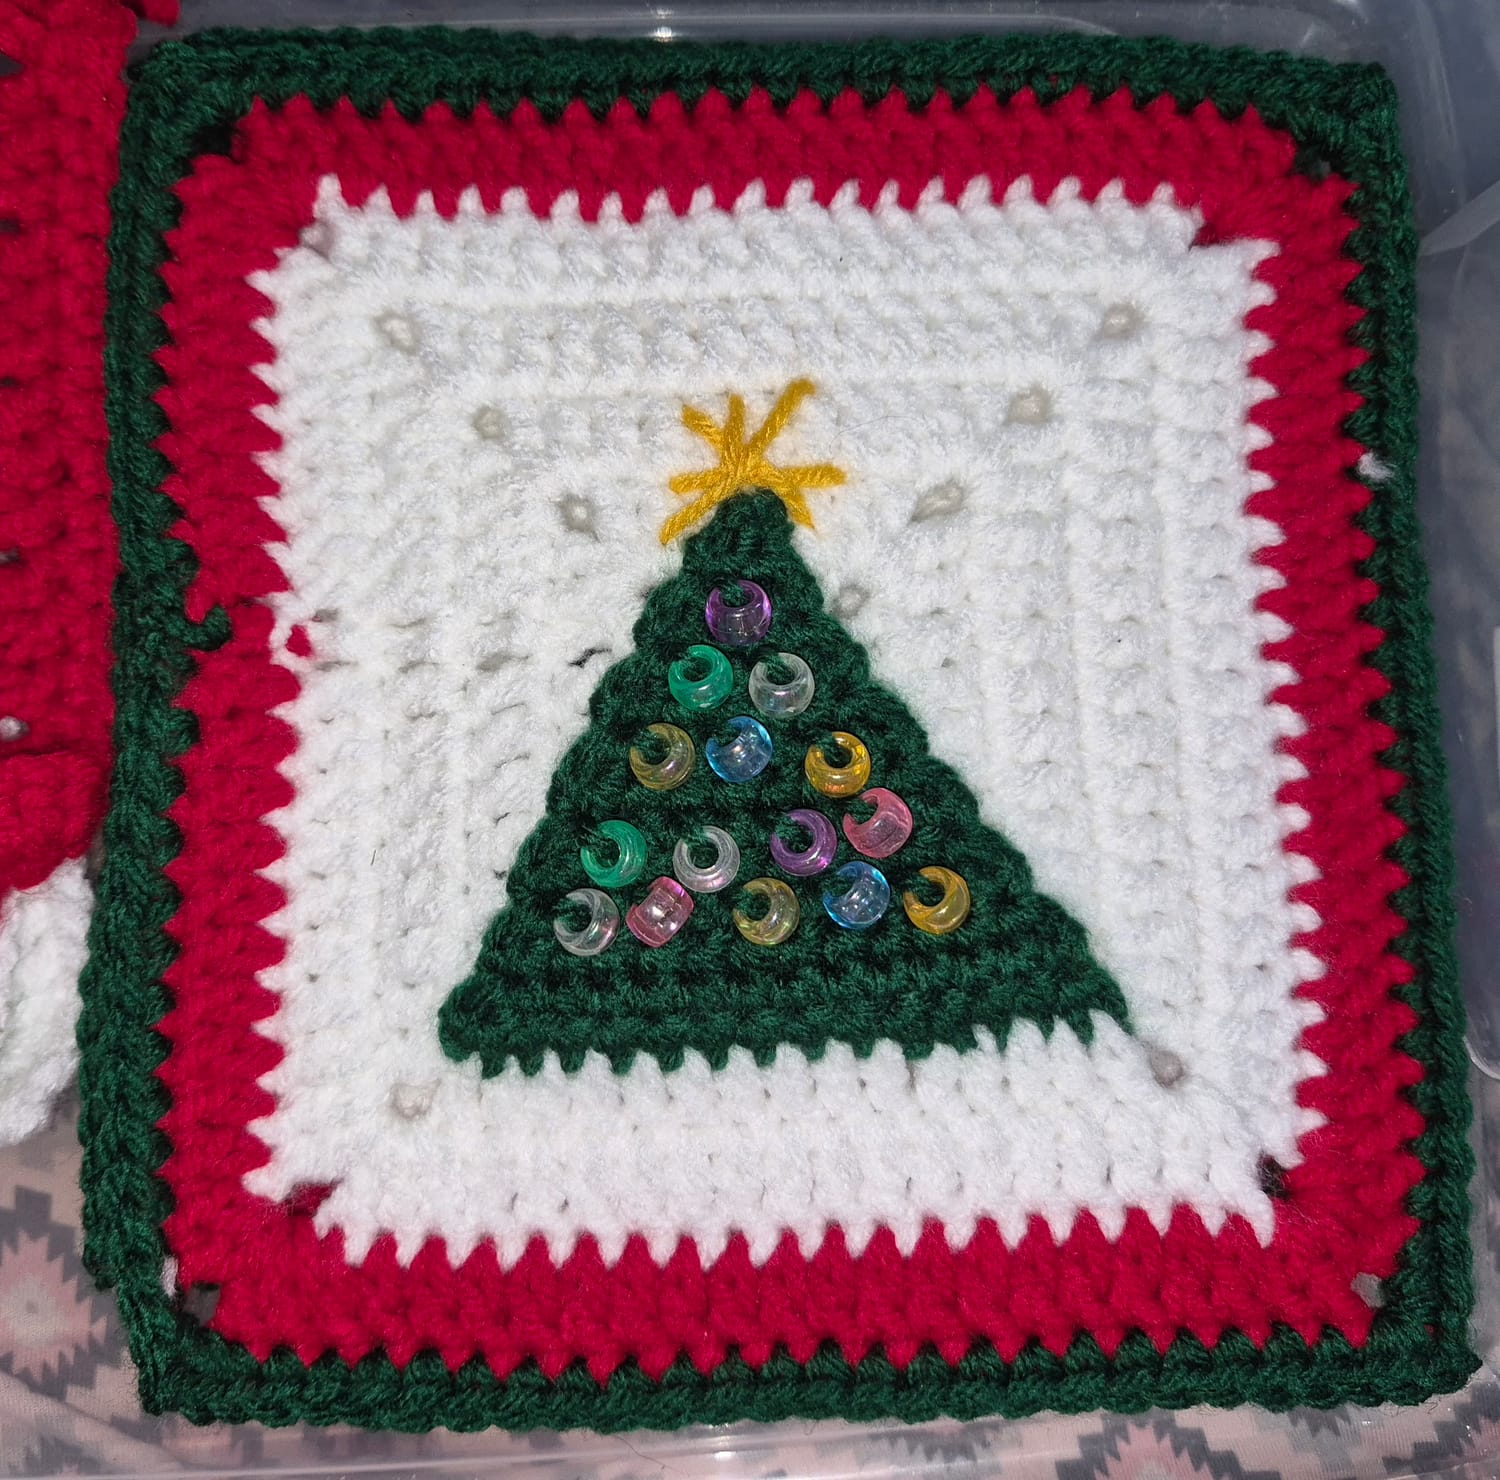
☐ Crochet 4 Christmas Tree squares
☐ Crochet 2 Santa Hat squares
☐ Crochet 2 Santa Belt squares
☐ Crochet your coordinating 4 filler squares
☐ Count your completed 14 squares
☐ Share your progress in the Hook Nook Community
Photos
Simple Stradegy For Success
Large projects become much more enjoyable when they're broken into smaller accomplishments. Here's one way to tackle this week's squares:
Start with your 2 Rudolph Squares
Your Rudolph square is one of the more detailed designs. Completing it first builds confidence and helps you settle into the project. Be sure to make it 6 rounds/rows in dc and the 7th in sc. Base can be your color of choice.
Mix in Your 4 Filler Squares
Basic granny squares make wonderful "rest rows." They're perfect to work on while watching a movie, listening to music, or enjoying your favorite podcast.
Crochet the Christmas Trees
As you work your tree squares, pay close attention to your background rounds. Keeping these rounds consistent across every square will make joining your cardigan much easier later. One option I am going with for 2 of my Squares is beads to decorate the tree.
Finish with the Santa Details
Wrap up the week by completing your remaining festive character squares until you've reached all 18.
Alterations from original pattern.
Use 4mm hook
Round 5 will repeat round 4
Round 6 change to white and complete a dc round in white
Round 7 change to gold and complete a sc round in gold (this is the patterns round 5, but in gold)
Melissa's Tips
Check Your Gauge Early
Before completing all 14 squares, lay your first three finished squares on top of one another.
Do they measure the same size? They should be approximately 7.5 inch squares.
Some square designs naturally crochet tighter or looser than others, even when they have the same stitch count. If you notice one design is noticeably smaller or larger, try adjusting your hook size before continuing. Making small adjustments now will save time and frustration later when it's time to assemble your cardigan.
Community Challenge
Show Us Your Progress!
Once you've finished your Week 1 squares, stack them into a colorful pile and snap a photo from the side to show off all those beautiful layers and textures.
Share your photo inside the Hook Nook Community under the Show & Tell Topic; Christmas In July Post so we can celebrate your progress together and cheer each other on throughout the Crochet Along.
Every finished square is one step closer to a beautiful handmade Christmas cardigan. Keep stitching—you've got this!
Looking Ahead
Next week, we'll add even more holiday magic to our cardigan with colorful Christmas Lights, cheerful Peppermint Swirls, festive Wreaths, Santa's Face, and additional filler squares.
By the end of Week 2, you'll have 36 completed granny squares and your cardigan will really begin to come to life. You'll also start planning your color placement and get your first glimpse of how all of the festive designs work together.
For now, enjoy the journey, celebrate your first 18 squares, and remember—every stitch brings you one step closer to a cozy handmade Christmas cardigan!
Week 2
July 13, 2026
Adding Holiday Cheer
Welcome back to the Christmas in July Cardigan Crochet Along!
You made it through Week 1, and now it's time to add even more color, texture, and personality to your cardigan. By the end of this week, you'll have 36 completed granny squares, putting you two-thirds of the way to your finished holiday masterpiece!
This week's featured squares include festive Christmas lights, peppermint swirls, holiday wreaths, and cheerful Santa-inspired designs. Each one brings a little extra holiday magic to your cardigan.
Check List
☐ Crochet your 4 Christmas Light squares.
☐ Crochet your 4 Peppermint Swirl squares.
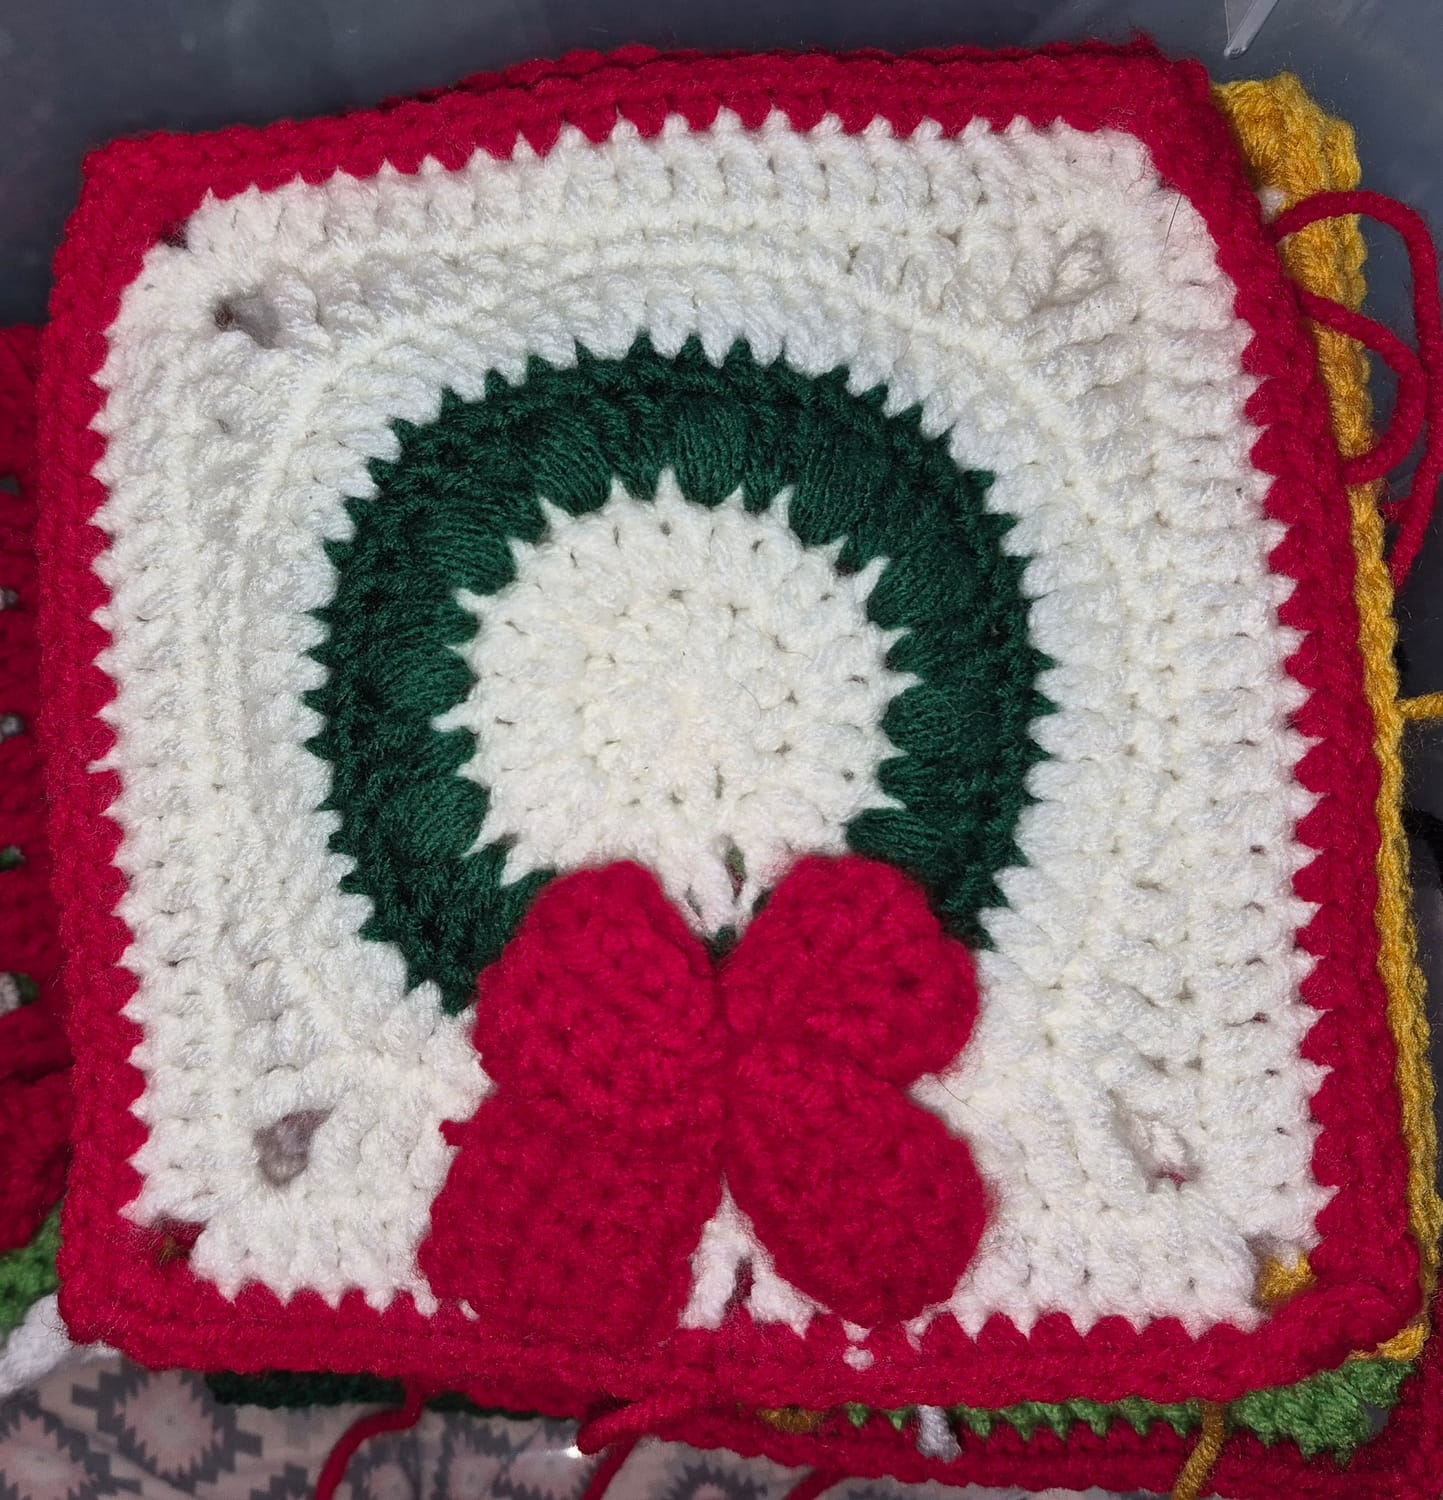
☐ Crochet your 4 Wreath squares.
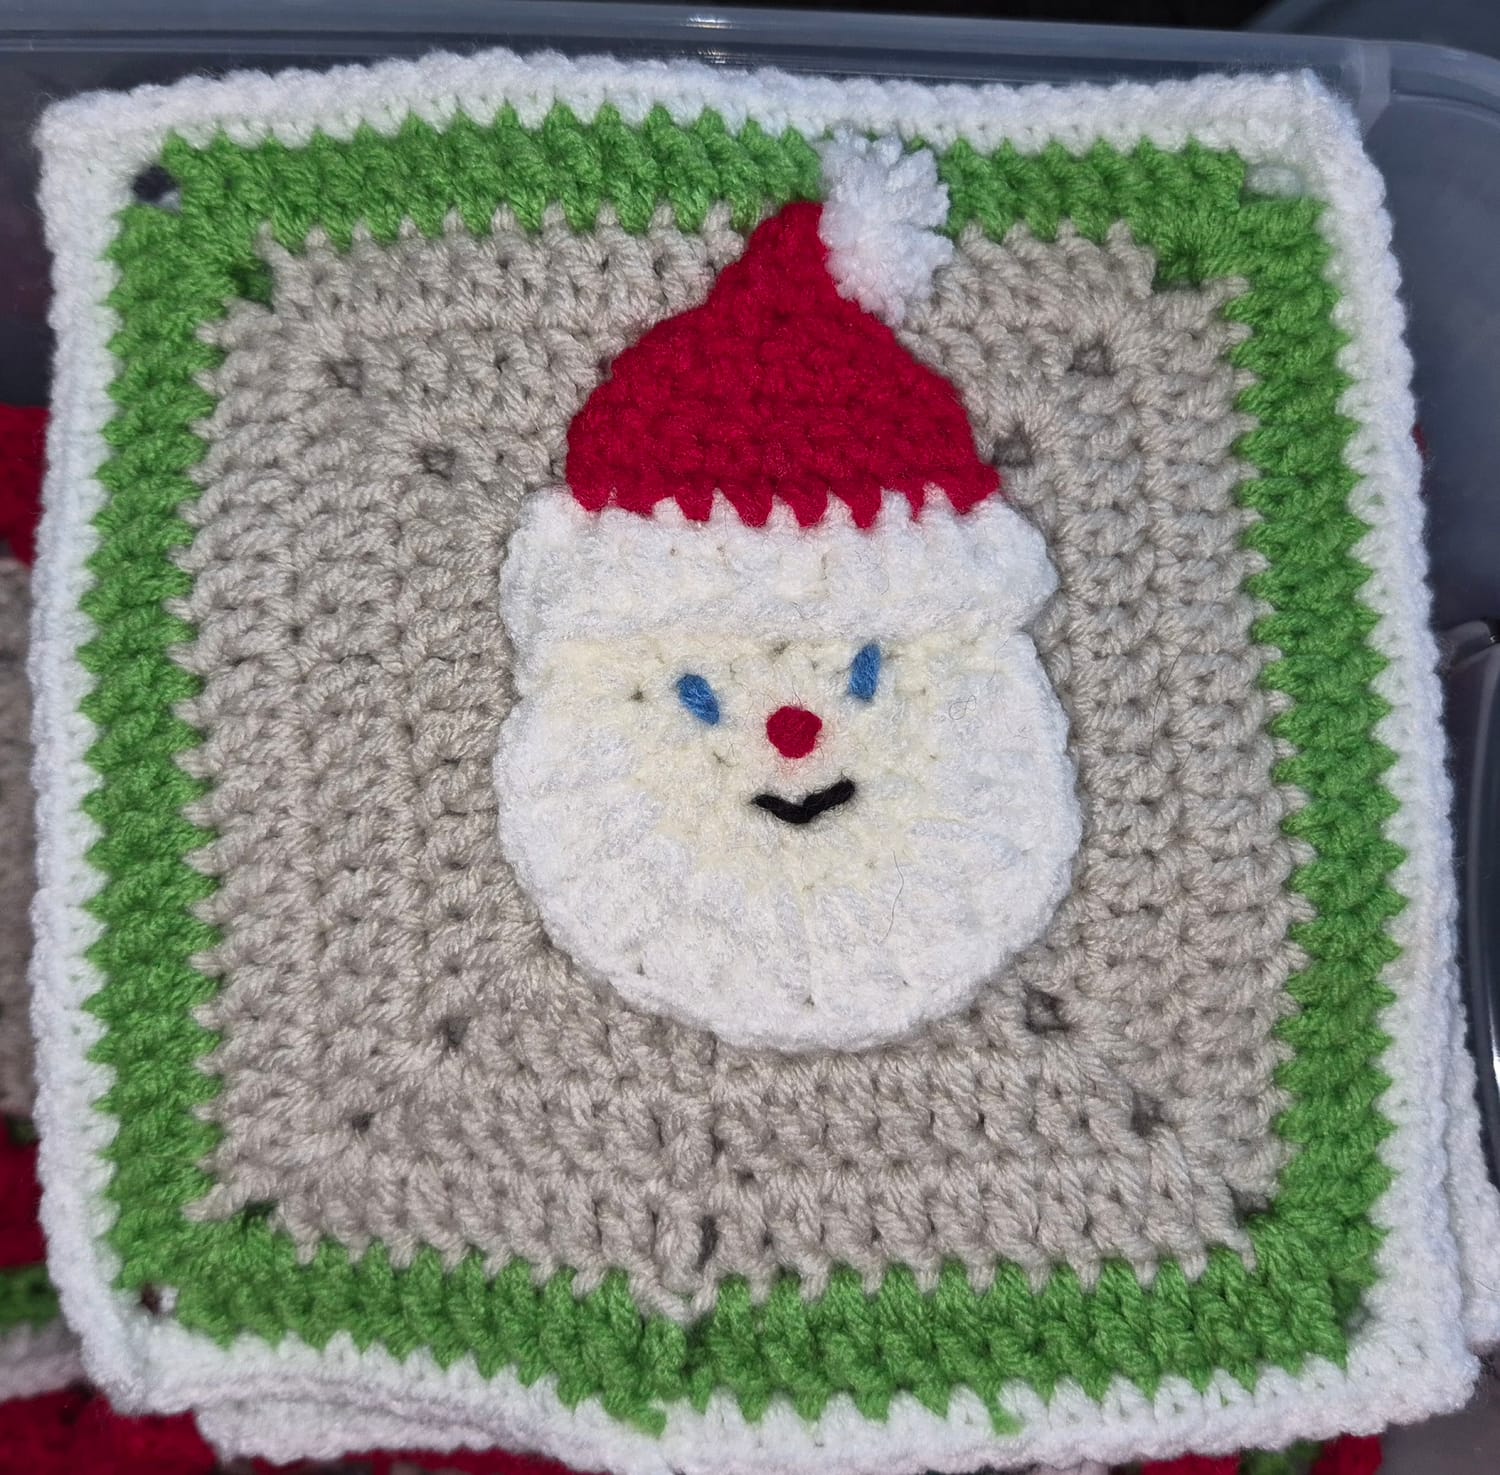
☐ Complete your 2 Santa Head Squares.
☐ Complete your 4 Filler Squares.
☐ Count your completed 36 squares.
☐ Lay out all of your finished squares and admire your progress.
☐ Share your Week 2 photos in the Hook Nook Community.
Photos
Simple Strategy for Success
This week's squares are full of color and fun textures! Breaking them into smaller groups can help you stay motivated and avoid feeling overwhelmed.
Start with the Christmas Lights
Begin by crocheting your four Christmas Light squares. They're quick to complete and instantly add a festive pop of color to your growing collection.
Alterations from original pattern:
Round 7: DC in each stitch around making the corners (2dc, ch2, dc) on short sides and (dc, ch2, 2dc) on long sides. This will even out the sides to square them up. Join in first DC, ch2
Round 8: DC in each stitch around making the corners (2dc, ch2, 2dc). Change to border color. Join in first DC, ch 1
Round 9: SC in each stitch around making 3 sc in each corner. Join in first sc.
Take a Peppermint Swirl Break
Next, work on your four Peppermint Swirl squares. Take your time, keep your yarn untangled, and enjoy watching the swirls come to life.
Alterations from original pattern:
Follow to round 4
Round 5: change color, chain 6, TR in same stitch, TR, DC, HDC, 5SC, HDC, DC, TR, (TR, CH2, TR) repeat from to 3 times. Join at 4th chain from original CH6 with SL ST. CH 3
Round 6: DC in each stitch around making the corners (2DC, CH2, 2DC). Join at top of CH3 with SL ST. CH1
Round 7: SC in each ST around making 3SC in each corner.
Add the Wreaths
Crochet your four Christmas Wreath squares, paying attention to keeping your background rounds consistent with the rest of your project.
Move on to the jolly Santa Faces
What better way to wrap up the characters for today than with 'ol Saint Nick. This one is a video.
Finish with the Filler Squares
Wrap up the week by crocheting your four coordinating filler squares. These help balance the brighter designs and make your final cardigan layout beautifully cohesive.
By the end of the week, you'll have 36 completed squares—two-thirds of your cardigan finished and well on your way to assembling your festive holiday masterpiece!
Melissa's Tips: Taming the Peppermint Swirl
The Peppermint Swirl squares can feel a little more challenging because you'll be working with multiple colors throughout the design.
Here are a few tips to make them easier:
Pause every few rounds to untwist your yarn.
Keep your tension relaxed and consistent.
If your swirl square feels noticeably tighter than your other squares, don't be afraid to size up your hook slightly for this pattern.
Remember, consistency in finished square size is much more important than using the exact same hook for every design.
Community Challenge
Let Your Lights Shine!
Line up your completed Christmas Light squares and snap a photo showing off your favorite color combinations.
Are you creating a traditional Christmas palette, or are you embracing bright retro holiday colors?
Share your photo inside the Hook Nook Community under the Show & Tell Topic; Christmas In July Post so we can celebrate your progress together and cheer each other on throughout the Crochet Along.
I can't wait to see how everyone's cardigan is coming together. You're over halfway there, and it's already looking wonderfully festive. Keep stitching—you've got this!
Looking Ahead
With 36 squares finished, this is the perfect time to begin planning your cardigan layout.
Spread all of your completed squares across a table, bed, or even the floor.
Try mixing your brighter, busier squares throughout the design instead of placing them side by side. Alternate them with your coordinating filler squares to create a balanced, eye-catching layout.
Don't worry about getting everything perfect yet—we'll fine-tune the arrangement before assembly.
Week 3
July 22, 2026
The Winter Finale
Welcome to the final week of crocheting individual squares!
Congratulations! By the end of this week, you'll have all 50 granny squares completed and ready for assembly. Take a moment to celebrate how far you've come. Three weeks ago, this cardigan was just an idea. Now it's almost ready to become a cozy holiday wearable you'll be proud to show off.
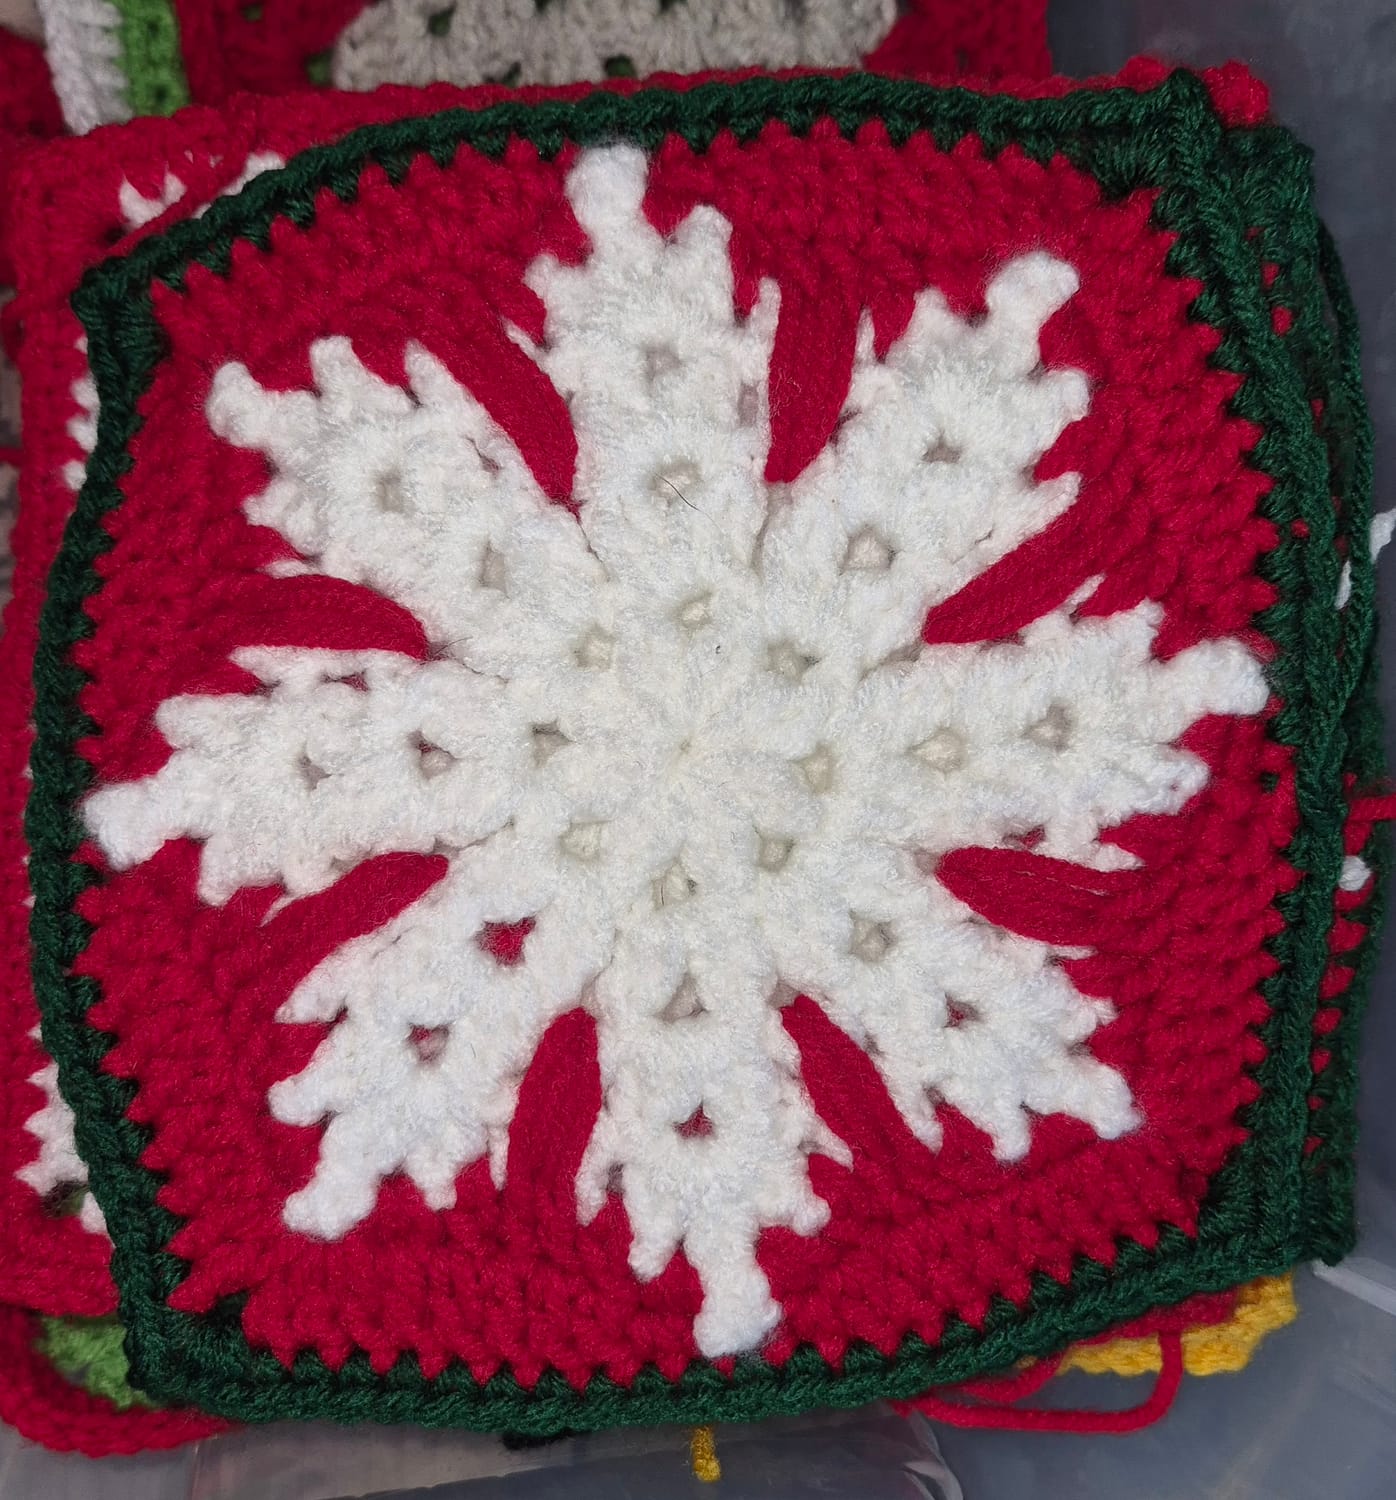
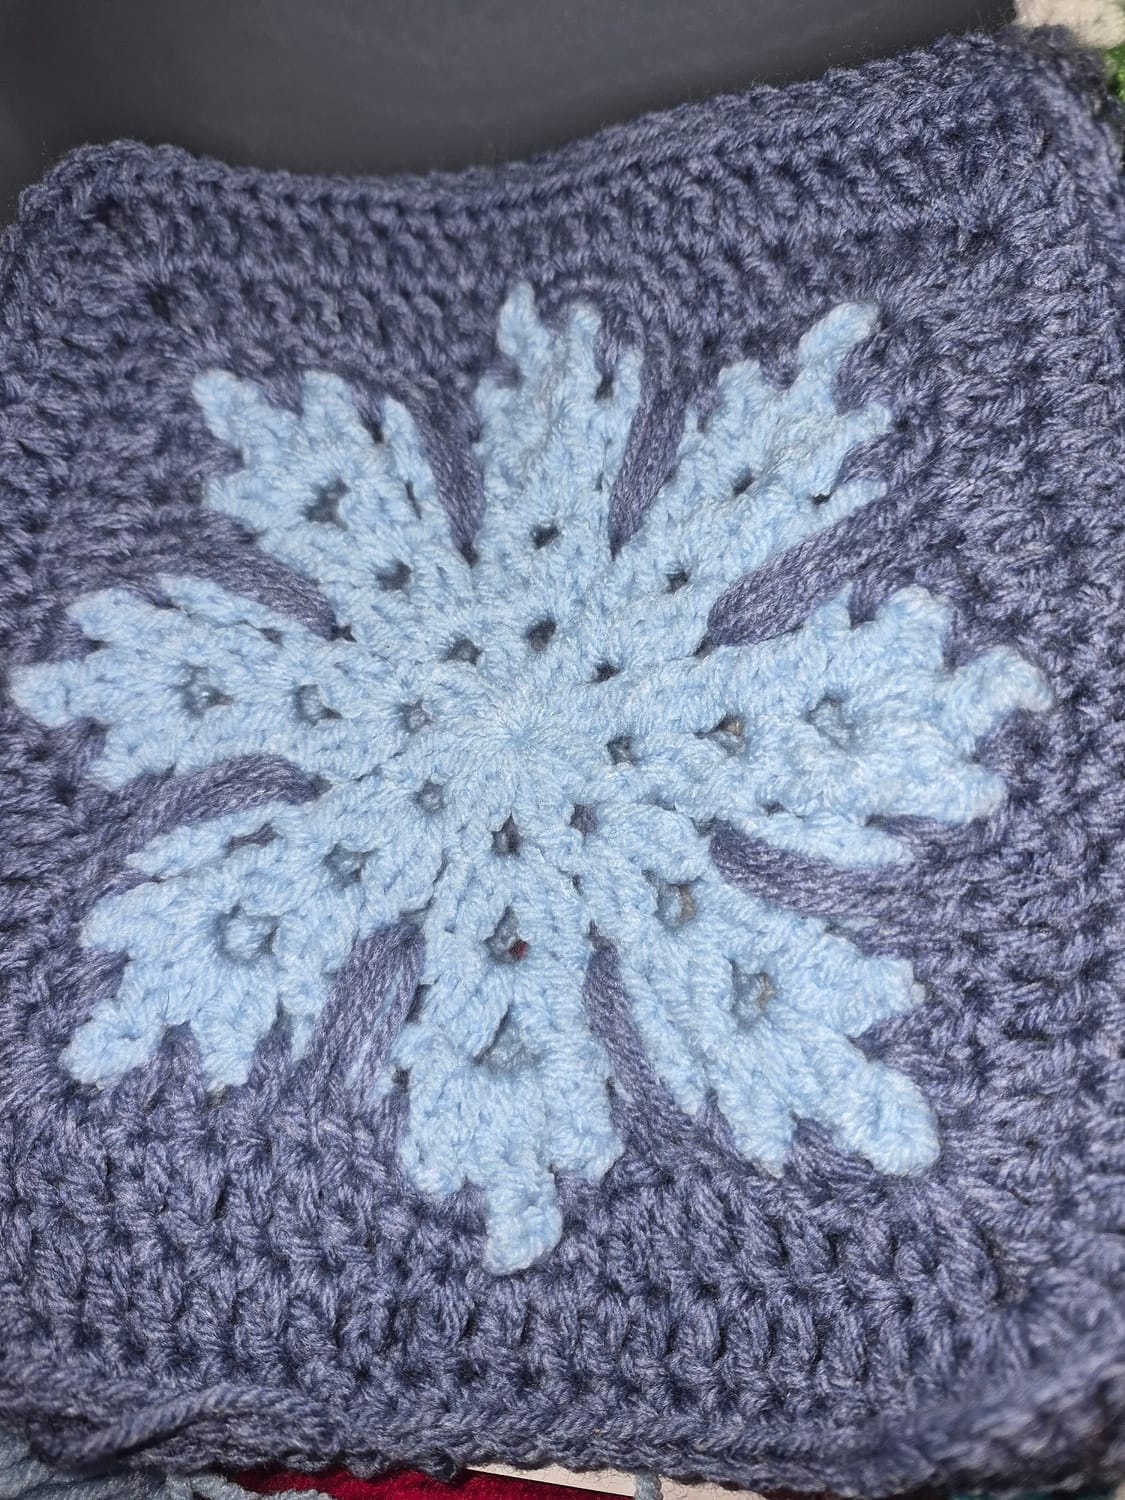
This week's designs capture the beauty of a winter wonderland with delicate snowflakes, festive gift boxes, and the final coordinating filler squares that bring balance to the entire cardigan.
Check List
☐ Crochet your 4 Snowflake squares.
☐ Crochet your 4 Gift Box squares.
☐ Crochet your 4 Blizzard Snowflake squares.
☐ Crochet your 6 filler squares.
☐ Count all 50 completed squares.
☐ Check that your squares are a consistent size.
☐ Weave in any remaining yarn ends.
☐ Lay out your cardigan design.
☐ Share your progress in the Hook Nook Community.
Photos
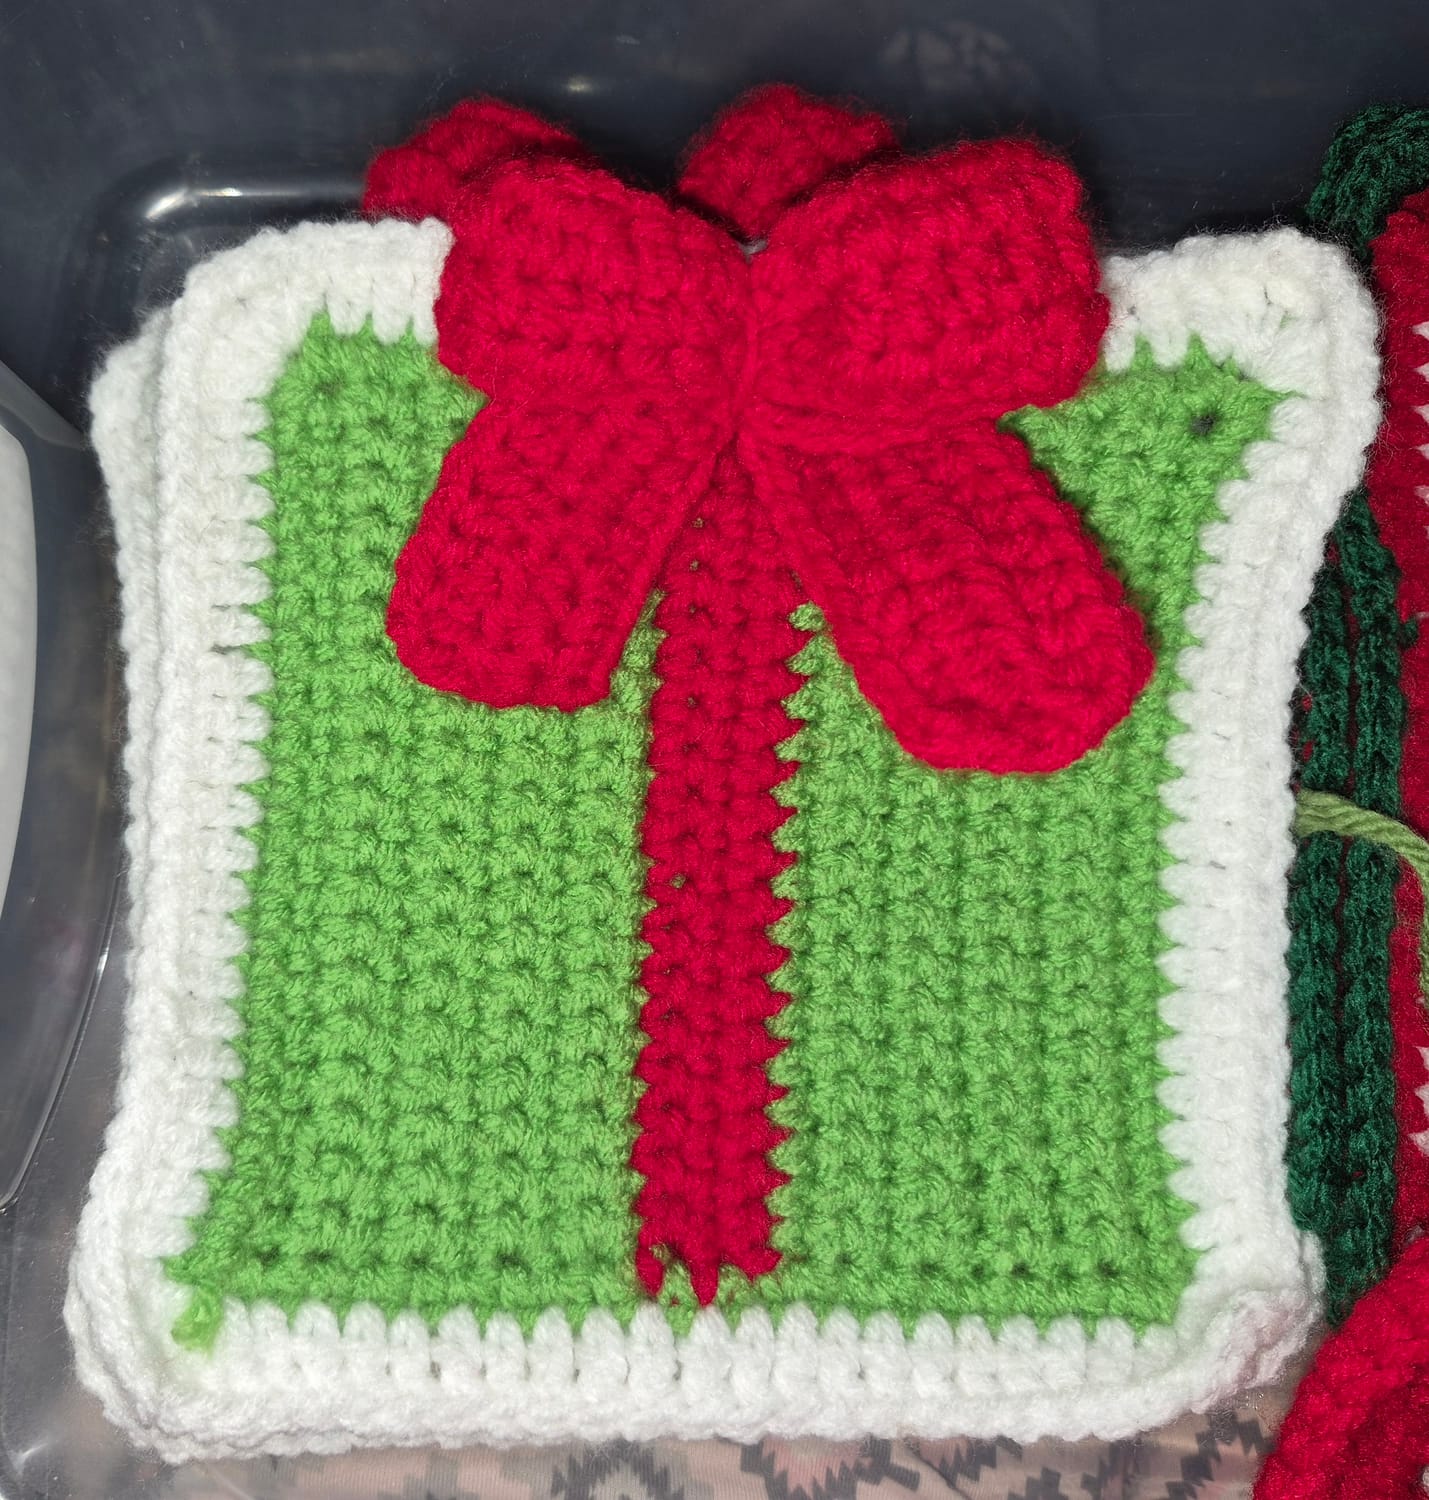
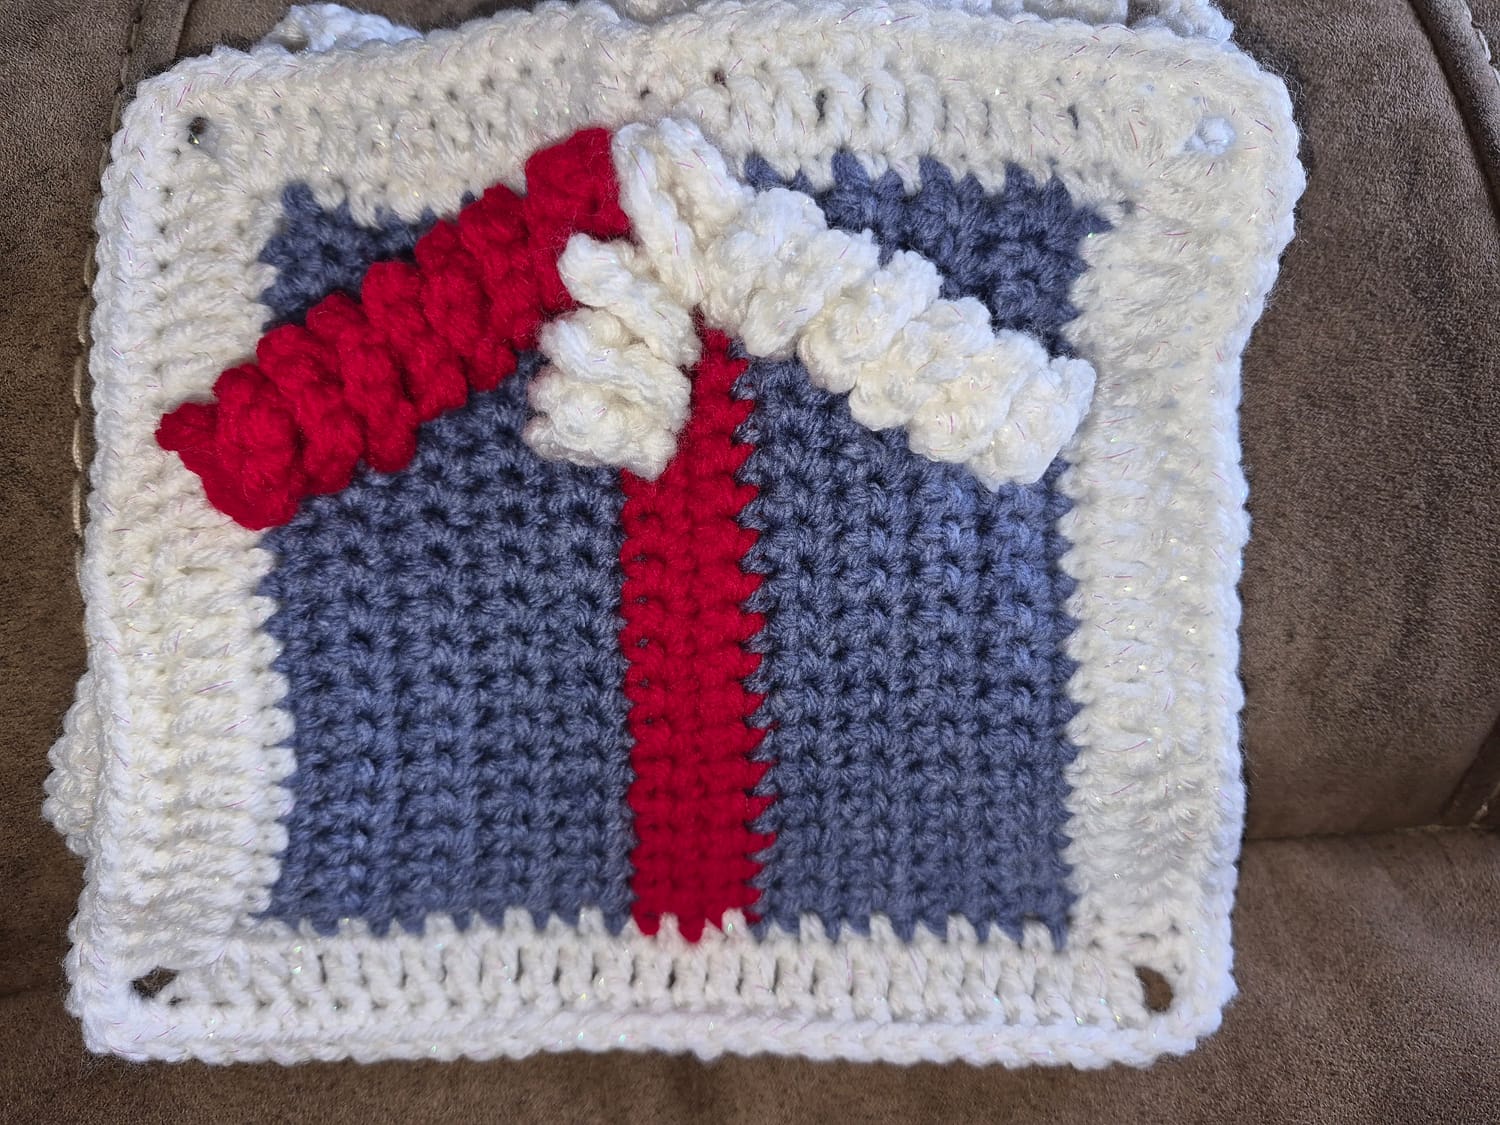
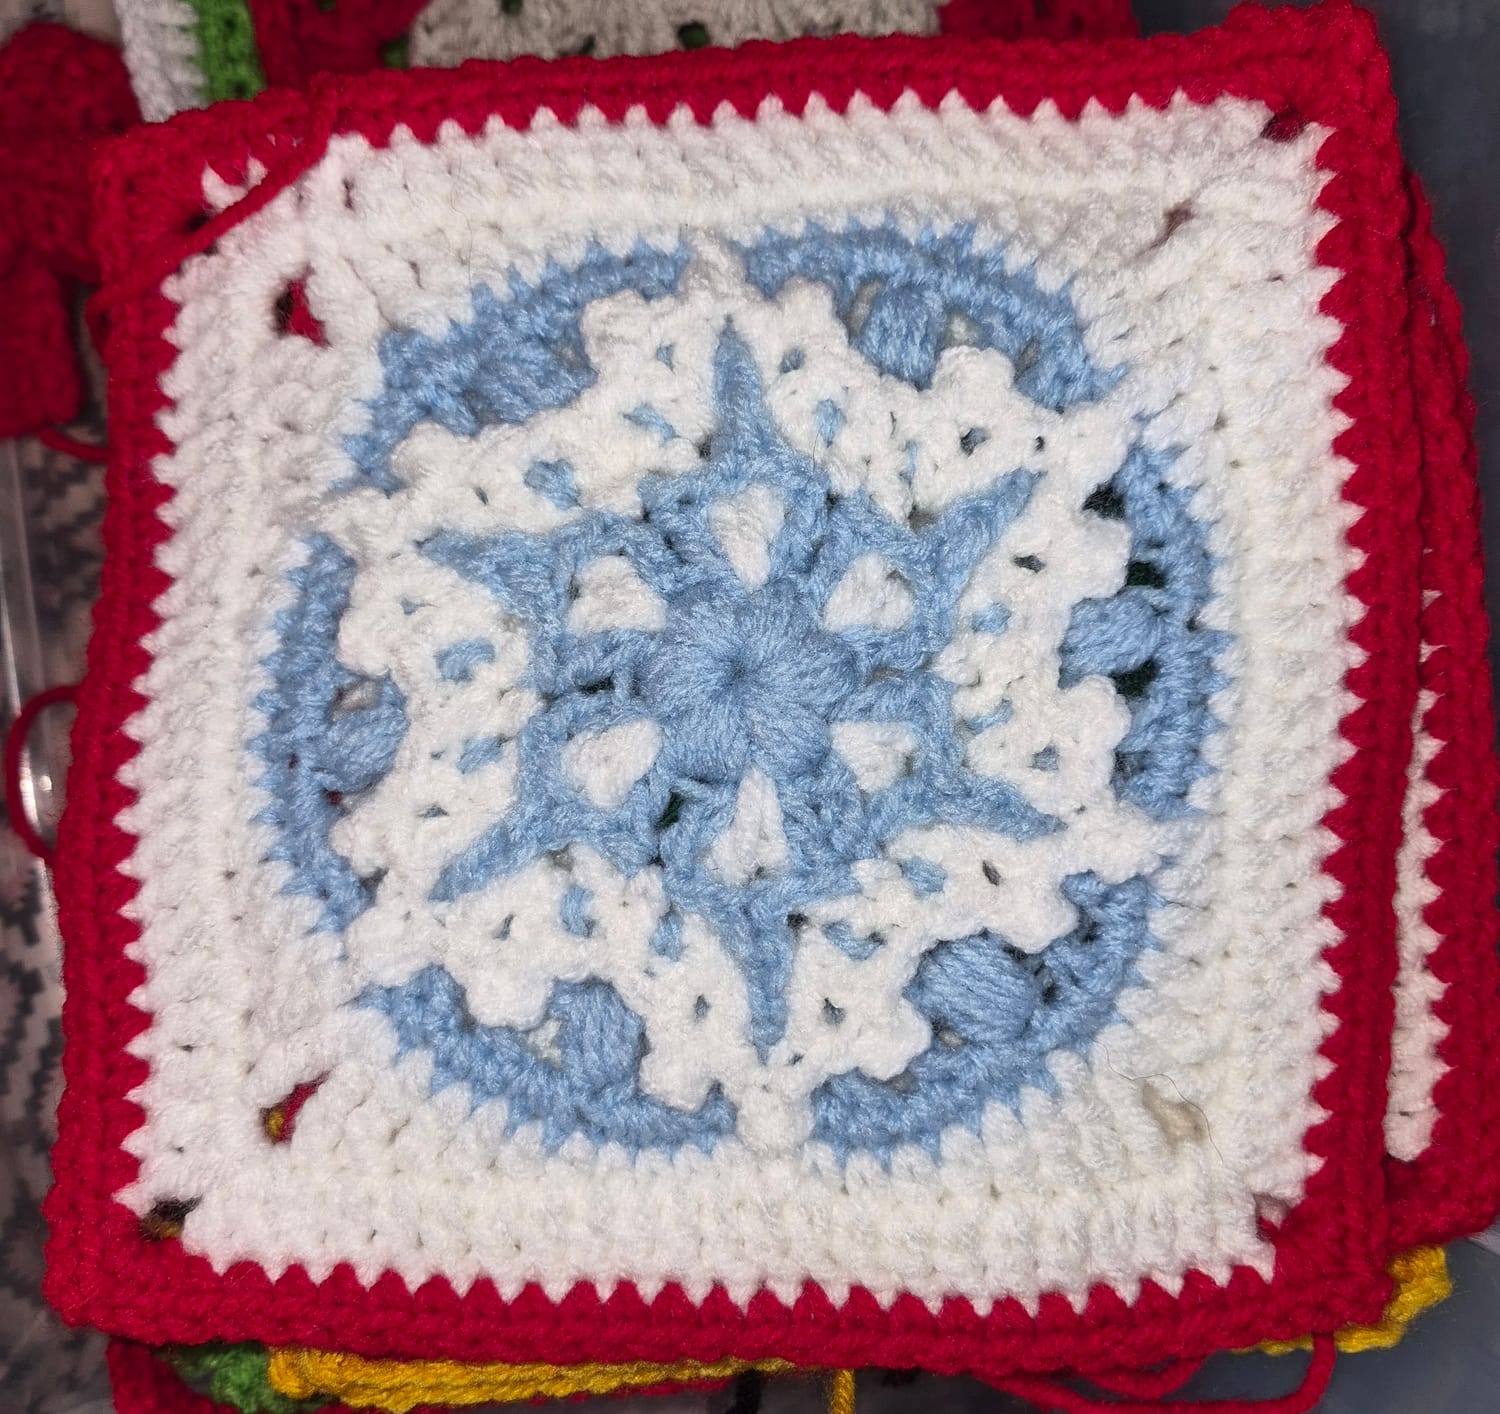
Simple Strategy for Success
You're in the home stretch! Finishing strong is easier when you break the work into small, rewarding steps.
Start with the Snowflakes
Begin by crocheting your Simple Snowflake and Blizzard Snowflake squares while your excitement is high. Each design brings its own unique winter charm, and completing them first sets the tone for your final collection of holiday squares.
Special instructions for Blizzard Flake:
Follow Pattern to ROUND 6, then go to this pattern for ROUNDS 7 & 8
ROUND 9 (Be sure to skip the chain 1 space all around) Attach boarder color anywhere and chain 6 (counts as tr + 2ch), tr in same stitch, dc, hdc, 10 sc, hdc. dc, tr, (tr, ch2, tr)*. Repeat 2 more times. tr, dc, hdc, 10sc, hdc, dc, tr, join with sl st in the 4th chain of original ch 6.
ROUND 10: Ch 3 (counts as first dc) dc in each stitch across making 2dc, ch2, 2dc in each corner, sl st in top of first ch3.
ROUND 11: ch 1, sc in each stitch around making 3sc in every corner. sl st to join in first sc.
Wrap the Gifts
Next, crochet your Gift Box squares. Have fun choosing ribbon colors that complement the rest of your holiday palette and make each present feel special.
Alternate instructions:
Complete through Border Round 1 of original pattern.
Border Round 2: Continue border in new color. Chain 3 (counts as first DC, dc in each stitch around making (dc, ch2,dc) in each corner, join with sl st, ch 1
Border Round 3: sc in each stitch around making 3sc in each corner.
Fill in the Gaps
Finish the week's crocheting by completing your remaining Basic Granny Squares. These filler squares help balance the more detailed holiday motifs and tie the entire cardigan together.
Prepare for Assembly
As each square is finished, weave in the ends, check that it's consistent in size with your other squares, and place it into your planned layout. Spending a few extra minutes on these finishing touches now will make next week's catch up and assembly much smoother.
By the end of the week, you'll have all 50 granny squares completed and be ready to transform them into a cozy Christmas cardigan!
Melissa's Tips : The Giftbox Square
The Gift Box square is a simple design with a charming finishing touch.
Crochet the base using your favorite festive color.
Use a contrasting yarn color for the ribbon details.
Finish by attaching the bow securely to the center of the square.
It's a simple square that adds wonderful holiday charm to your finished cardigan.
Getting Ready for Assembly Week
Now that your square collection is complete, spend a little time preparing before we begin assembling the cardigan.
Count Your Squares
Lay out all 50 squares and make sure everything is complete.
Check Your Sizing
Compare several squares together. If any are noticeably larger or smaller, now is the perfect time to make any needed adjustments.
Block Your Squares
If you haven't blocked your squares yet, this is a great time to do so. Blocking helps every square become more uniform and makes joining much easier.
Weave in Your Ends
Future you will be grateful! Put on your favorite Christmas movie or holiday playlist and finish weaving in those last yarn tails before assembly begins.
Planning Your Layout
Before joining your cardigan, experiment with different arrangements.
Alternate detailed character squares with coordinating filler squares to give each design room to shine. Move pieces around until you're happy with the overall balance of colors and textures.
Remember, there's no single "correct" layout. Make it uniquely yours!
Community Challenge
Show Us Your Full Collection!
Lay out all 50 completed squares in the arrangement you've chosen for your cardigan.
Take a photo and share it inside the Hook Nook Community under the Show & Tell topic in the Christmas in July post.
This is a huge milestone, and I'd love to celebrate it with you before we begin assembling our cardigans next week.
Congratulations! You've officially completed every granny square. Next week, we'll transform this beautiful collection into a cozy Christmas cardigan you'll treasure for many holiday seasons to come.
Looking Ahead
Next week is all about bringing your Christmas in July Cardigan to life!
If you're caught up, we'll begin joining our 54 granny squares, adding the sleeves, crocheting the ribbing, and putting on the finishing touches that transform a stack of squares into a cozy handmade cardigan.
Need a little extra time? That's perfectly okay! Week 4 is also your opportunity to catch up on any remaining squares, weave in your ends, block your pieces, and prepare for assembly at your own pace.
Remember, this Crochet Along isn't about racing to the finish—it's about enjoying the journey and creating something you'll be proud to wear for many holiday seasons to come. I'll see you next week as we assemble our festive masterpiece, one seam at a time!
Week 4
July 29, 2026
Catch Up & Assembly Week
Congratulations—you made it!
Whether you completed all 50 squares last week or are putting the finishing touches on your final few, this is the week everything comes together. One by one, your festive granny squares will transform into a cozy Christmas cardigan you'll be excited to wear year after year.
Take your time during assembly. There isn't a prize for finishing first, and slowing down now will help you create a cardigan you'll be proud of every time you pull it from your closet.
Check List
Transform your 50 granny squares into a finished Christmas cardigan!
This week we'll:
☐ Catch up on any remaining granny squares.
☐ Block your squares, if needed.
☐ Weave in any remaining yarn ends.
☐ Join the back panel.
☐ Join the front panels.
☐ Sew the shoulder seams.
☐ Assemble and attach the sleeves.
☐ Sew the side and sleeve seams.
☐ Add the front and neckline border.
☐ Crochet the sleeve cuffs.
☐ Finish the bottom border.
☐ Try on your finished cardigan!
Photos
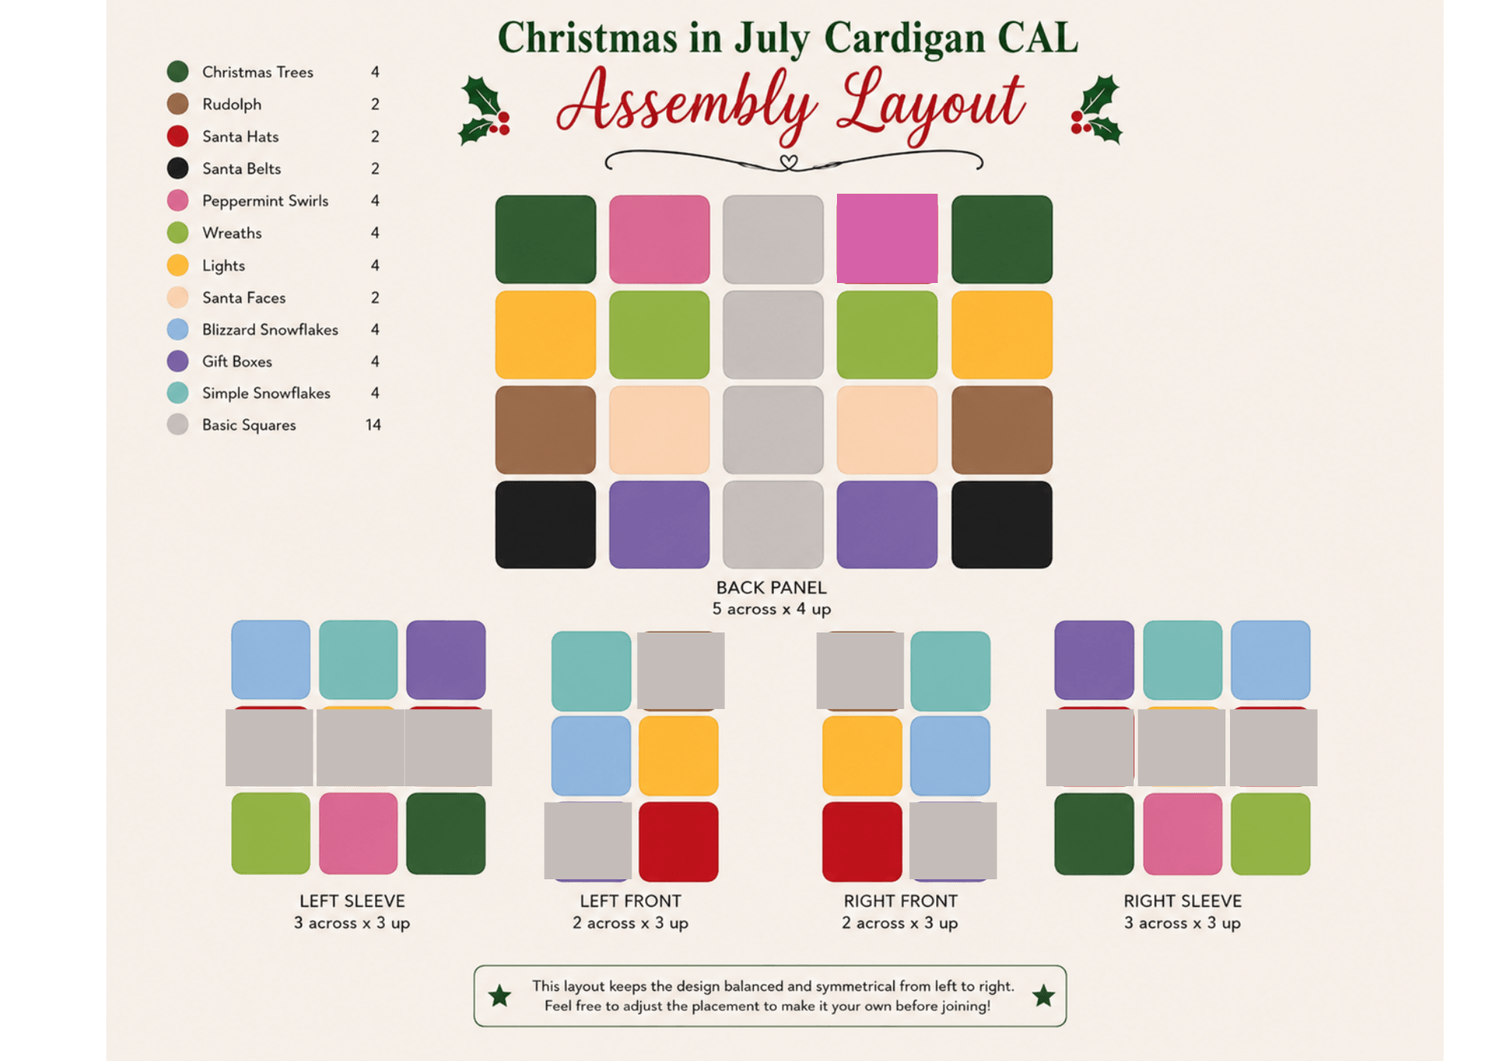
Since I do not have alot of room in my home to lay out my cardigan, i have used this layout to help me figure my design. Fell free to use it as a guide for yourself as well.
Simple Strategy for Success
Assembly is much less overwhelming when you tackle one section at a time.
Finish Any Remaining Squares
If you're still catching up, complete those last few squares before moving on. There's no rush—we're all finishing together.
Prepare Your Squares
Block your squares if needed and weave in any remaining ends. A little preparation now makes joining much easier.
Build the Cardigan in Sections
Join the back panel first, then each front panel. Next, assemble the sleeves before connecting everything together.
Add the Finishing Touches
Complete your borders, cuffs, and any final details. Then step back and admire everything you've accomplished!
Assembly Layout
Using your preferred layout as a guide:
Back Panel
Arrange your back panel according to your chosen cardigan size.
Front Panels
Arrange the left and right front panels, checking that your favorite holiday squares are balanced throughout the design.
Sleeves
Lay out your sleeve squares before joining so you can make any last-minute adjustments.
Before you begin joining, take one final look at your layout. Rearranging a few squares now is much easier than after they're sewn together.
Joining Your Squares
There isn't one "right" way to join granny squares. Choose the method you enjoy most and use it consistently throughout the cardigan.
Slip Stitch Join
Creates a decorative raised seam that beautifully outlines each square.
Single Crochet Join
Adds texture and extra structure while creating a cozy handmade look.
Mattress Stitch
Produces a nearly invisible seam for a polished finish.
No matter which technique you choose, consistency is the key to a beautiful finished cardigan.
Melissa's Tips
Build It One Section at a Time
Instead of joining all 50 squares at once, celebrate smaller milestones.
Join the back panel.
Join each front panel.
Assemble the sleeves.
Sew the shoulder seams.
Attach the sleeves.
Sew the side and sleeve seams.
Finish with the borders and cuffs.
Checking each step off your list makes the process feel much more manageable—and a lot more fun!
Finishing Touches
Before calling your cardigan complete, take a few moments for the final details.
☐ Crochet the front and neckline border.
☐ Add cozy ribbed cuffs to each sleeve.
☐ Crochet the bottom border.
☐ Weave in any remaining yarn tails.
☐ Block your finished cardigan if desired.
Then put it on, take a twirl, and enjoy the beautiful handmade piece you've created!
Community Challenge
Christmas Cardigan Reveal!
It's time for the grand finale!
Share a photo of your finished cardigan inside the Hook Nook Community under the Show & Tell topic in the Christmas in July post.
Whether you're wearing it, hanging it on a hanger, or displaying it on a mannequin, we'd love to celebrate your accomplishment.
Share with us:
🎄 Which granny square was your favorite to crochet?
🎄 Which joining method did you choose?
🎄 What color palette did you use?
🎄 What would you love to crochet together in our next Crochet Along?
Congratulations
Congratulations on completing the Christmas in July Cardigan Crochet Along!
Thank you for allowing me to be part of your crochet journey. I hope every time you wear your cardigan, you're reminded of the joy, creativity, and community we shared.... one festive stitch at a time.
Gallery
As members submit photos, I'll add them here.
Frequently Asked Questions
Can I substitute yarn?
Yes, just be careful of gauge as it will change the size of end project.
Can beginners make this?
Yes, I believe an experienced beginner can.
Can I join late?
Yes, you can join any time!
Where do I ask questions?
Please submit any questions to hello@naturallymelissamade.com with subject Christmas In July CAL
How do I download the pattern?
Unfortunately since this is built from squares others have designed a written pattern is not available via me. The individual creators may have a written pattern you can download. If so, they are listed below:
Rudolph page 114 (affiliate link)
Share Your Progress
Final Reveal
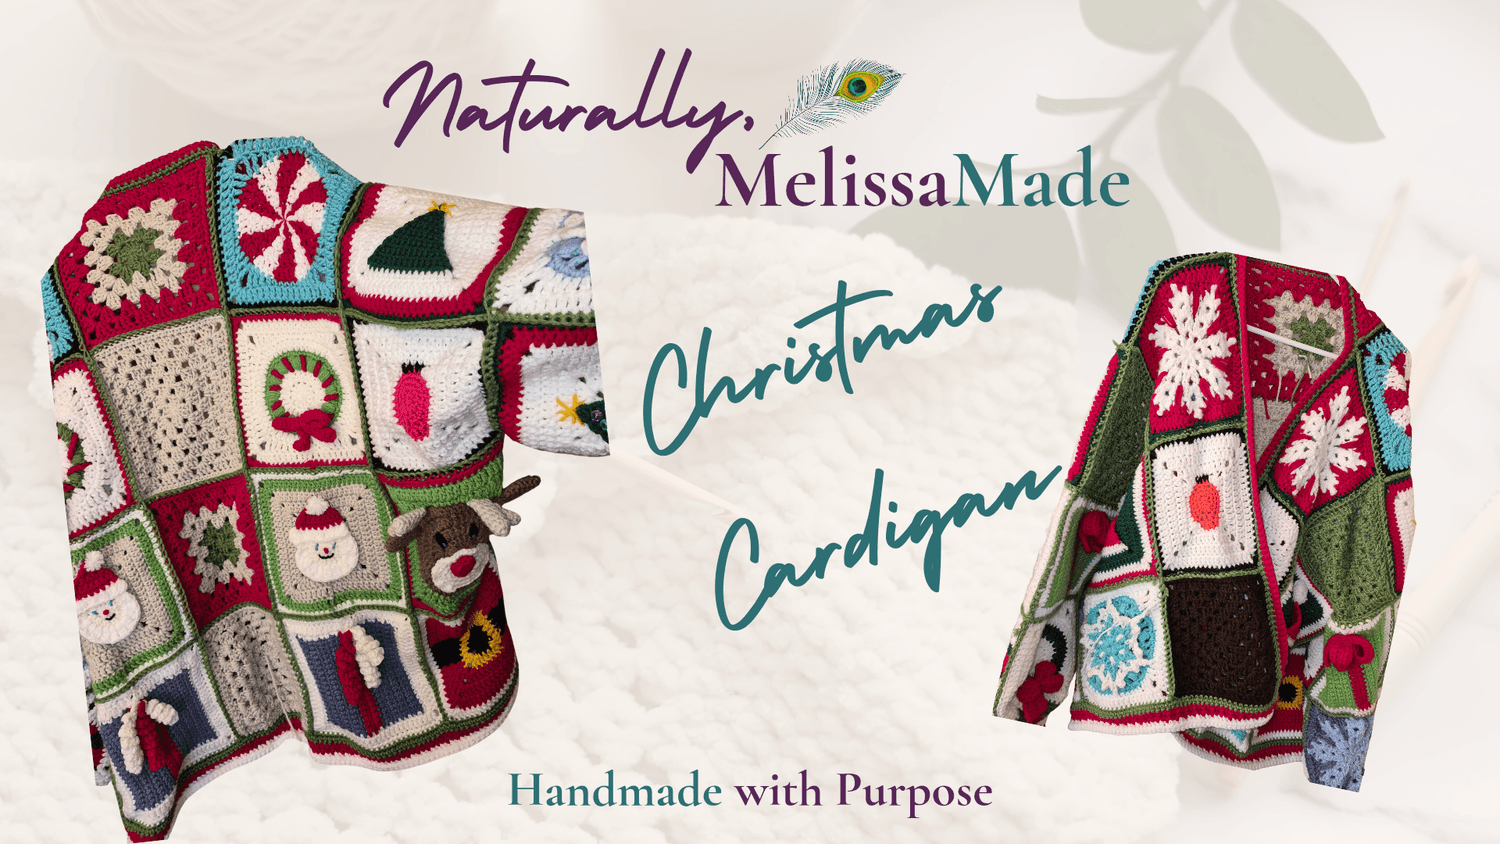
What I Learned
I did not take into account the stitch count for all of the squares on the last round. I will need to revise them at a later date.
Favorite moments
I absolutely loved seeing it all come together!
Thank everyone for crocheting together.
From the very bottom of my heart, thank you for being part of the Christmas in July Cardigan Crochet Along.
Whether you finished every square right on schedule or took a few extra weeks to complete your cardigan, I hope this project brought you moments of joy, creativity, and peace. Crochet isn't about rushing to the finish line—it's about the memories we make with every stitch, the confidence we build along the way, and the community we create together.
I hope every time you slip on your Christmas cardigan, you're reminded of the time you invested in yourself, the skills you developed, and the friends who were crocheting alongside you from near and far.
Thank you for sharing your progress, encouraging one another, asking questions, and making this Crochet Along such a wonderful experience. Your creativity is what brings this community to life.
I would absolutely love to see your finished cardigan! If you haven't already, be sure to share a photo inside the Hook Nook Community and celebrate everything you've accomplished. Your project may be just the inspiration another crocheter needs to begin their own journey.
Most importantly, I hope this is just the beginning.
There will always be another project waiting, another stitch to learn, and another Crochet Along to enjoy together.
Until next time...
Keep creating.
Keep learning.
Keep encouraging.
And never stop finding joy, one stitch at a time.
Happy crocheting,
Melissa
Naturally, MelissaMade 🧶💜
What's Next?
Next Crochet Along
Pattern Library
Beginner Course
Shop
Hook Nook Community
Newsletter

HEY, I’M MELISSA…
Hi, I'm Melissa—the creator behind Naturally, MelissaMade, founder of The Hook Nook, and dreamer of the Purple Peacock Bus.
As a homeschooling mom, homesteader, crochet educator, and handmade artisan, I've discovered the incredible power creativity has to bring peace, confidence, and connection.
What began as a simple hobby became my sanctuary, inspiring a business and community dedicated to helping others experience the therapeutic benefits of crochet one stitch at a time.



JOIN MY MAILING LIST
The Hook Nook Chronicles shares crochet tips, inspiration, community stories and creative growth.
912-655-3428
Newsletter
Subscribe now to get daily updates.
Lorem ipsum dolor sit amet, consectetur adipisicing elit. Autem dolore, alias, numquam enim ab voluptate id quam harum ducimus cupiditate similique quisquam et deserunt, recusandae.